
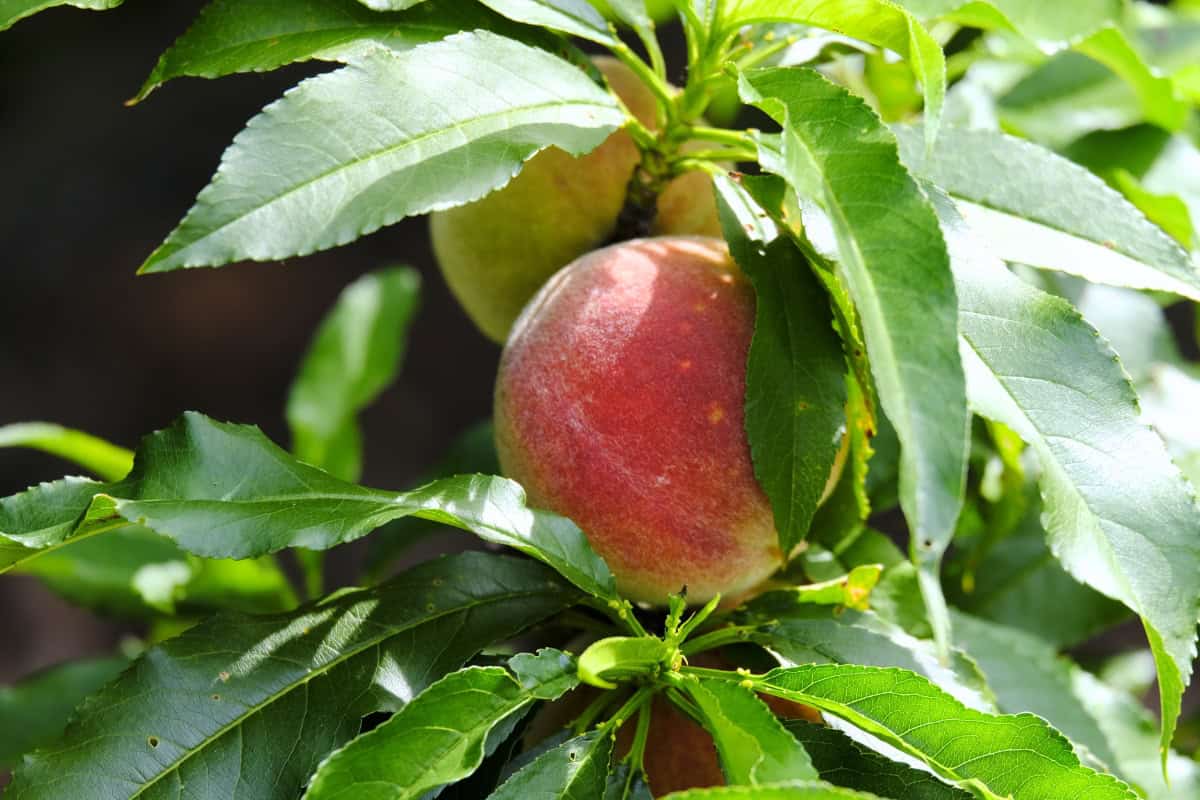
I know you can walk into a nursery and buy a peach tree that’s already a couple of years old and ready to plant. So why bother starting from a pit? Because it’s satisfying to take what most people throw in the trash and turn it into a fruit-bearing tree.
However, peach trees can be tricky to grow if you don’t know what you’re doing. Don’t worry, I’ve got your back with everything you need to know from peach pit germination to fruiting success. Here’s what we’ll cover:
- From pit to peach, no experience needed
- Why patience pays off
- How to avoid winter damage with strong scaffolds
- Why your peach tree never produces fruit
Things You’ll Need
Before you begin, gather a few simple supplies to give your peach pit the best chance to sprout and grow.
- Fresh peach pit
- Paper towels
- Resealable plastic bag or container
- Small pots with drainage holes
- Well-draining potting mix
What You’ll Actually Grow
Your seed-grown peach tree will be able to produce fruit, but it might not be identical to the peach you pulled the pit from.
The commercially grown peaches you find at a store are from specially bred varieties. The fruit-bearing part of the tree was attached to a separate rootstock; the hardy root system of a different tree. All seed carries DNA from both the parents, so your tree, and eventual fruit, will be a unique genetic combination.
The good news is that unlike other fruit trees, peach fruit reproduces reasonably close to the parent. You may produce fruit that’s slightly smaller, or a little different in sweetness, but it will be very similar to the one you started with.
Step #1: Choosing and Preparing
The pit you choose and and preparation are important to the ultimate success of your tree. A commercially grown peach from a store was probably grown in a different climate, picked before fully ripe, then stored in coolers for weeks, which can kill the seed.
Locally grown fruit that ripened on the tree gives you a much better chance at a viable seed, farmers’ markets and backyard trees are your best sources. At the very least, choose peaches grown in a climate similar to yours.
A pit from a tree that thrives in Georgia may struggle in Minnesota, and vice versa. Start with 3-4 pits to ensure you will end up with at least one germinating.
Best Peaches for Growing From Seed
- Fully ripe peaches with soft, fragrant flesh
- Locally grown varieties adapted to your climate
- Freestone peaches because the pit releases cleanly
- Fruit harvested during peak season
Since you’re sourcing fresh produce, check out our garlic-growing guide to turn more scraps into a harvest.
Peaches to Avoid
- Underripe fruit with hard, pale flesh
- Pits that are moldy, cracked, or damaged
- Peaches refrigerated for extended periods
- Heat-treated imported fruit
Cleaning and Drying the Pit
Hold the pit under running water and scrub off all remaining flesh. Set your clean pits on a paper towel in a place with good air circulation and let them dry for two to three days. You’re waiting for a pit that feels completely dry with no sticky or soft spots.
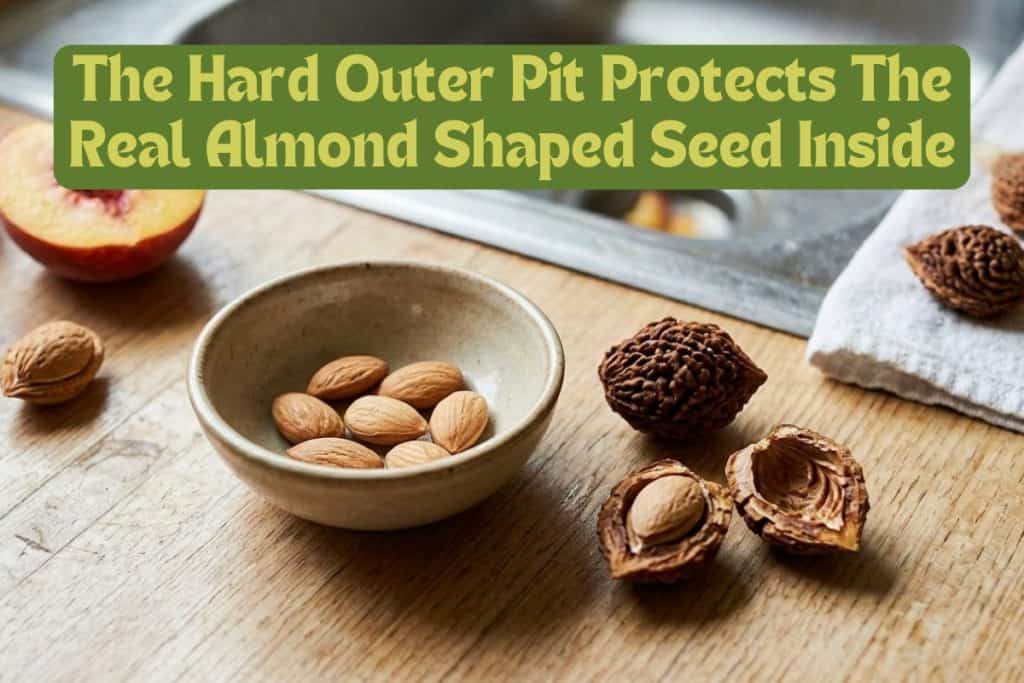
What’s Inside the Pit
The hard, wrinkly shell isn’t the seed, it’s a protective casing called the endocarp. The real seed is inside: a small, almond-shaped kernel about the size of a large almond.
SAFETY NOTE: Seed kernels contain trace amounts of a natural compound (amygdalin) which can release small amounts of cyanide when eaten. You can handle the seed, but don’t eat it or let kids or pets play with it.
Step #2: Germination Techniques
There are two main techniques for germinating a peach pit.
You can choose the method that fits your patience and timeline. Peach seeds are designed not to sprout right away. This built-in waiting period prevents seeds from sprouting in autumn only to be killed by the first freeze.
The two methods below use different approaches to overcoming dormancy, but both work well.
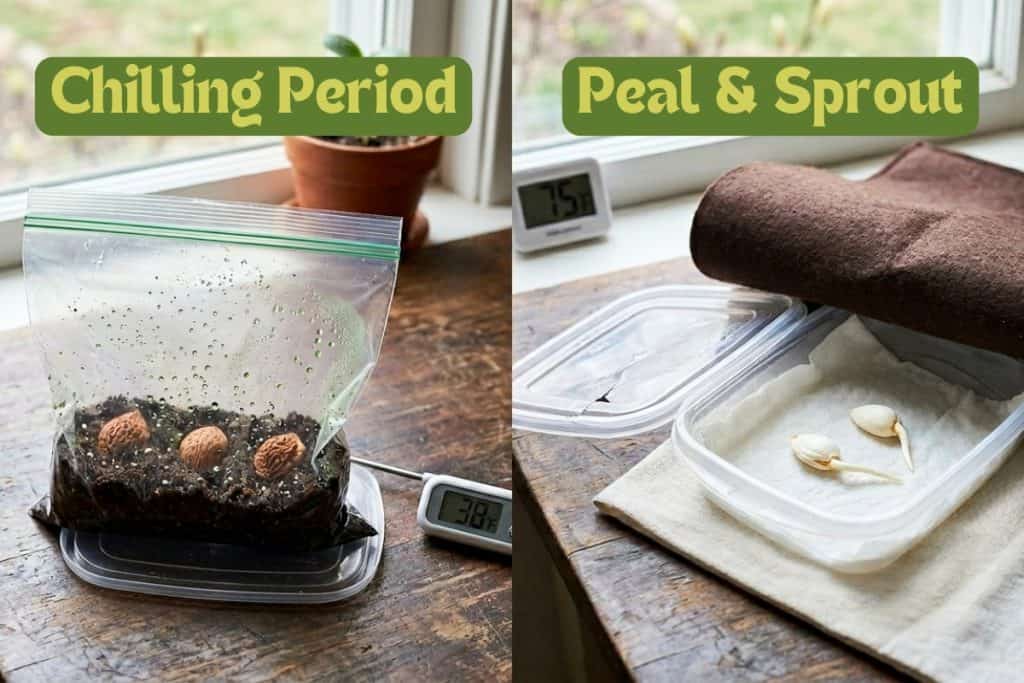
Method 1: Chilling Period (Stratification)
Peach trees and their fruit are both genetically required to go through a cold period. A mature tree needs between 600 and 1,000 hours below 45°F each winter to flower and set fruit the following spring.
This is why peach trees grow and fruit well in USDA hardiness zones 5–9, where winters satisfy this requirement. If you live in a very warm climate, your tree may grow beautifully but struggle to fruit.
If you aren’t in a hurry, giving the seed the cold it needs to break dormancy is an easy choice. Most peach seeds need 10–12 weeks of cold between 34–45°F. Cutting the time short in the refrigerator is one of the most common reasons the cold fails.
7 Steps For Chilling The Seed
- Gently crack the hard outer pit and remove the seed kernel inside. (Optional, for better results)
- Prepare moist potting mix so it feels like a damp sponge.
- Place the seed or intact pit into a resealable plastic bag or small lidded container with the potting soil.
- Store in your refrigerator for approximately 12 weeks. Check every week or two for mold.
- After the cold period, move the container to a warm indoor area (65-80°F) with bright, indirect light. While your peach seeds wake up, check out our guide to growing sweet strawberries for faster results.
- Watch for a root over the next four to eight weeks. The root typically emerges before any green shoot.
- When you see a root, transplant it into a small pot (4–6 inches) filled with well-draining potting mix and move to indirect light.
Method 2: Peel and Sprout
By removing the seed’s protective layers, then providing warmth and moisture, you can break dormancy and see root activity in as little as two weeks.
There is more risk of damaging the embryo during preparation, but for faster results, it’s a great option.
6 Steps for the Peel and Sprout Method
- Crack the hard outer pit along its seam and remove the seed kernel inside. Be gentle; don’t crush the seed
- Put the extracted seed in room-temperature water for 8 to 12 hours.
- Peel away the outer brown skin of the seed. Be extremely gentle near the pointy end, where the sprout will emerge.
- Place the peeled seed between two layers of damp paper towels inside a shallow plastic lidded container. Cover with a dark towel and keep in a warm spot (~75°F).
- After five days, start checking moisture daily. Mist with water if needed. By day seven you should see the seed splitting or a white root tip emerging. By days 10–14, you should see about an inch of root.
- Once you see the root, transplant into a small pot with well-draining potting mix, about one inch deep with the root pointing downward. Water lightly and place in bright, indirect light.
After Potting Care
Now that your seed is potted, it depends on you for light, warmth, and water. Keep your pot in a warm location (65–80°F). A south-facing windowsill works well for most homes. Water when the top inch of soil feels dry.
Within a few weeks, a green shoot will push through the surface, and once the first true leaves unfurl, your seedling is ready for stronger light.
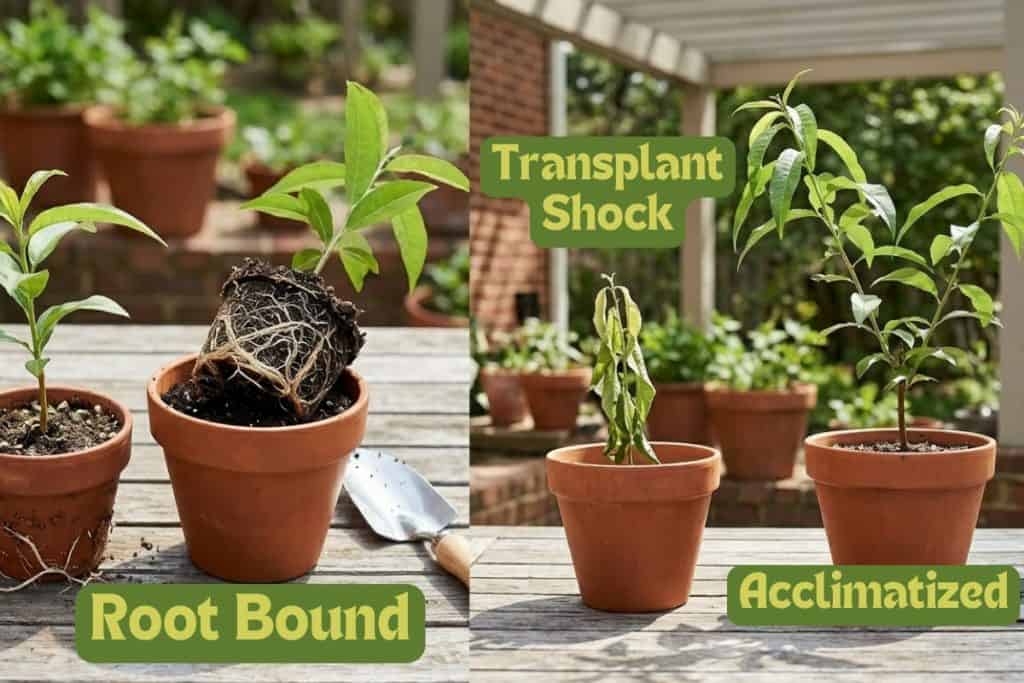
Step #3: Repotting and Acclimatizing
A healthy peach seedling grows fast, so it won’t take long before a four-to-six-inch pot is full of roots. A root-bound seedling can’t take up water or nutrients efficiently so its growth will stop.
Watch for these signs it’s time to repot:
- Roots poking out of drainage holes
- Soil drying out faster
- Growth visibly slowed or stalled
- Seedling is top-heavy or disproportionate to its container
5 Steps To Repot Seedlings
Going up one pot size to an eight or ten-inch pot is a good step for most peach seedlings.
- Water your seedling lightly before repotting.
- Fill the new pot one-third full of fresh potting mix.
- Turn the old pot on its side and slide the seedling out, hold the stem at the base.
- Place the root ball in the new pot at the same depth it was growing and fill around it with potting mix.
- Water until water runs from the bottom, then return to its bright, warm spot.
Drooping or paused growth is completely normal, give it a week, and it will bounce back. You can also fertilize lightly at this point.
Acclimatizing (Hardening Off)
Once your seedling is ready to go outside, it needs to be acclimatized or hardened off. This is a gradual conditioning of your seedling to outdoor conditions. If you skip this, you risk transplant shock that can set your tree back for weeks.
Most seedlings are ready for acclimatizing when they reach 12–24 inches tall and all danger of frost has passed. A late frost can kill a young peach tree overnight. The gradual process takes 7–10 days.
10 Day Recommended Schedule
- Days 1–2: Sheltered, shady spot for 1-2 hours, then back inside.
- Days 3–4: Increase to 3-4 hours with morning sun only.
- Days 5–6: Extend to 5-6 hours, allowing some direct morning and early afternoon sun.
- Days 7–8: Full-day outdoors matching your final planting location’s sun. Bring in only if temps drop below 50°F.
- Days 9–10: Leave outside overnight if temperatures stay above 50°F. Your seedling should not be wilting, scorching, or drooping.
Step #4: Planting Outdoors
Now that your acclimatized seedling is ready for its permanent home, the location you choose will influence everything that follows.
Look for a sunny, well-drained spot. South-facing slopes are ideal because they warm up earlier in spring and provide maximum sun exposure. Air circulation matters almost as much as sunlight.
Stagnant, humid air around the leaf canopy invites fungal diseases. Avoid frost pockets; the low-lying areas where cold air settles on still nights. Peach trees bloom early in spring, and their blossoms are notoriously vulnerable to late frosts.
Ideal Planting Conditions
- Full sun with at least eight hours of direct exposure daily
- Good air circulation with no crowding from structures or dense plantings
- Slightly elevated ground that doesn’t collect standing water
- Protection from harsh north or northwest winds
Soil Requirements
Peach trees want soil that drains well, holds moderate fertility, and has a slightly acidic pH.
Ideal soil is sandy loam, with a pH between 6.0 to 6.5 and a good percentage of organic matter. For clay soil, mix in generous amounts of compost, aged bark, or other organic matter to improve drainage and loosen the texture.
Peach trees prefer well-drained sandy soil like potatoes, so check out our 8 steps to grow your best potato crop.
Spacing Considerations
A mature peach tree can spread 15–20 feet wide. Space your tree at least 15–20 feet from other trees, structures, fences, and utility lines.
Crowded trees compete for sunlight, water, and nutrients, so give them room to grow.
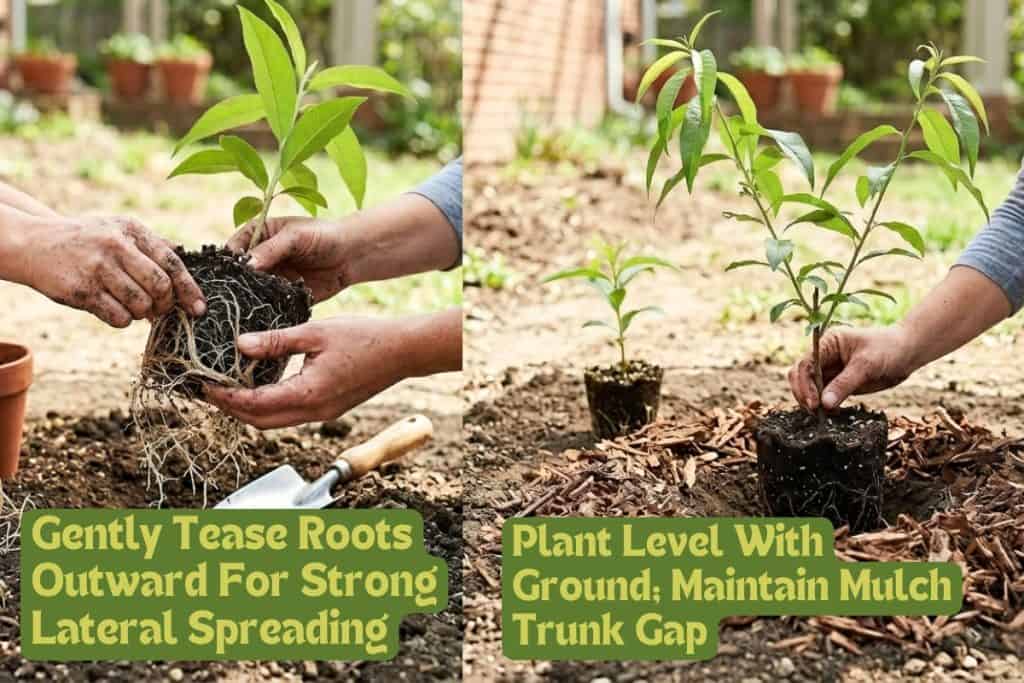
7 Steps To Plant Outdoors
When nighttime temperatures are consistently above 50°F and the ground is workable:
- Dig a hole roughly twice the width of your seedling’s root ball and just as deep.
- If your soil needs amending, mix compost into the excavated soil at roughly one part amendment to three parts native soil.
- Remove the seedling from its pot gently, if roots are circling the bottom, tease them apart so they’ll grow outward.
- Set the tree in the hole so the top of the root ball sits level with the surrounding ground.
- Backfill with your soil mixture, firming gently to eliminate air pockets.
- Water deeply and slowly until the entire root zone is saturated.
- Apply a 2–3 inch layer of organic mulch, wood chips, or shredded bark, in a circle around the base. Keep mulch at least 3–4 inches away from the trunk to prevent rot.
The First Week After Planting
The week immediately following transplanting is when your tree is vulnerable.
Water deeply every two to three days for the first two weeks, then gradually taper to deeper, less frequent watering. Let the roots settle for four to six weeks before fertilizing.
Step #5: First Year Tree Care
The first growing season determines your tree’s long-term health and productivity. Your young tree needs consistent attention to three fundamentals: water, light, and food.
Watering
During the growing season, aim for about an inch of water per week including rainfall. Water deeply but less frequently, deep watering encourages roots to grow downward.
Soak the entire root zone until the top several inches of soil are saturated, then let it dry slightly before the next watering.
Sun and Fertilizer
Peach trees need a minimum of eight hours of direct sunlight daily (see site selection in Step 4). Seedlings do best when daytime temperatures stay between 70–85°F during their first growing season.
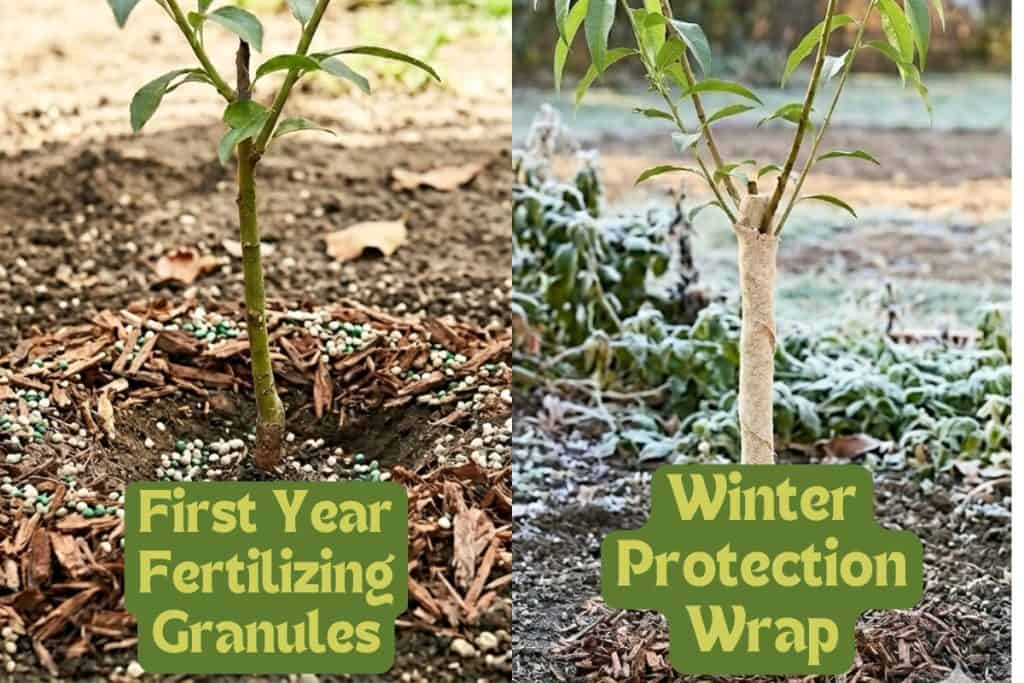
If your seedling is facing its first winter outdoors, protect it. Wrap the trunk with tree wrap or burlap from late fall through early spring.
First-Year Fertilizing
A balanced liquid fertilizer applied every three to four weeks is plenty for a first-year seedling. Slow-release granule blends feed gradually without risking burn on tender young roots.
When your tree enters its second growing season, you’ll shift to a program more focused on fruiting (see Step 7).
Step #6: Pruning and Training
Begin pruning once your seedling reaches about 24–30 inches tall (typically by the end of its first growing season). Early pruning establishes a framework that supports heavy fruit loads and resists storm damage.
Choosing a Training Form
Two forms work well for peach trees:
- Open Center (Vase Shape): The most common choice for peaches. At 24–30 inches, cut the main trunk back to encourage three or four well-spaced structural branches angled outward at roughly 45 degrees. This opens the canopy for excellent sunlight penetration and airflow.
- Modified Main Trunk: Retains a straight vertical stem with layers of side branches. This form offers more wind resistance but requires more exact pruning done more often.

When and How to Prune
Prune in late winter or very early spring, just before bud swell. This minimizes disease and lets you see the branch structure clearly. Use clean, sharp tools and sanitize blades with rubbing alcohol or a 10% bleach solution between cuts.
Each year, follow these 3 steps in order:
- Removing any dead, damaged, or crossing branches
- Thin interior growth to maintain airflow through the canopy.
- Shortening scaffold branches by about one-third to encourage lateral budding
Consistency matters more than perfection. A little pruning every year is better than waiting and doing major pruning every couple of years which will stress the tree.
Never remove more than 1/3 of the tree in one season.
Step #7: Fertilizing for Healthy Growth
A well-fed peach tree grows fast during its first few years, then shifts its energy to fruiting as it matures. Tailor your fertilization to the tree’s stage of development.
Year 1: Seedling Establishment
Once your seedling is established, apply a light dose of balanced fertilizer (such as 10-10-10) in early spring, about 1 tablespoon scattered in a ring 6 inches from the trunk, watered in well.
Years 2–3: Growing Leaves & Wood
Increase fertilizer (follow label), and split into two applications. The first in early spring as buds swell, and a second in late spring.
Spread fertilizer evenly out to the ground directly under the outermost tips of the branches (known as the drip line) and water thoroughly.
Year 4: Onward Fruiting Stage
After the third year, transition to a formula with lower nitrogen relative to phosphorus and potassium, such as 3-12-12. This discourages excessive leafy growth and encourages flower and fruit development.
Apply in early spring, adjusting quantity to canopy and trunk size and soil test results.
Pest and Disease Management
Peach trees are susceptible to a range of pests and diseases, but being proactive helps control most issues. A combined approach — cultural practices plus targeted treatments — gives the best results.
Cultural Practices
Cultural practices are your first line of defense and the easiest way to keep your tree and fruit healthy. These habits prevent most issues before they start:
- Sanitation: Remove and dispose of fallen fruit and leaves
- Airflow: Maintain an open canopy
- Watering: Water at the base of the tree rather than overhead
- Monitoring: Inspect your tree and fruit weekly during the growing season.
- Mulch: Conserves moisture, lowers soil temperature, reduces stress
Common Diseases
#1. Brown Rot: Small brown lesions that quickly expand into a rotting mass.
- Conventional: Apply fungicides at bloom, petal fall, and shuck split (papery flower falls off the green fruit); reapply every 7–10 days.
- Natural: Remove mummified fruit; the shriveled, dried-up peaches left hanging on the tree. Prune for an open canopy.
#2. Peach Leaf Curl: Leaves curl, yellow, and drop early
- Conventional: Apply dormant fungicide before bud break.
- Natural: Copper spray when fully dormant
Major Insect Pests
#1. Plum Curculio: Leaves crescent-shaped scars on fruit; larvae feed inside, causing premature drop.
- Conventional: Targeted insecticides at petal fall and shuck split.
- Organic: Spinosad spray
#2. Peach Scale (White Scale): Insect is covered with shell; sucks sap from bark.
- Dormant and summer oils; insecticides in spring; remove affected wood
Fruiting Patience and Payoff
Seed-grown peach trees typically take 3 to 5 years to produce their first fruit. That may seem like forever, but trust the process.
The years of pruning and care build the foundation of strong branches to hold maximum harvests.
Flowering
Most mature peach trees bloom in early to mid-spring. If a frost is forecast when your tree is in bloom, cover it overnight with frost cloth or a light sheet to protect developing flowers.
During the first three years, remove flower buds whenever practical. This allows your tree to use its energy to build wood and roots instead of fruit.
Pollination
Peach trees are largely self-fertile, meaning a single tree can set fruit on its own. However, having pollinators, like bees, significantly improves fruit set and size.
Encourage pollinators by planting flowering herbs or wildflowers and avoiding broad-spectrum insecticide sprays during bloom. If you don’t have other plants around, lightly shake limbs when the tree is flowering to spread the pollen.
Fruit Thinning
Once small fruits form, usually a few weeks after petal fall, thin them so the remaining fruit is spaced about 6–8 inches apart on each branch. Thinning prevents branch breakage, reduces pest and disease pressure, and produces larger, sweeter peaches.
Harvest
Peaches are ready to harvest when they give slightly to gentle pressure, have fully developed color, and release easily from the branch with a slight twist. Harvest in the morning when fruit is cool for the best shelf life.
Final Advice
Growing a peach tree from a pit is a fun project for kids, or anyone who wants to create a new unique tree that is unlike any other.
Except for pruning, your new tree won’t be any more maintenance than your other landscape plants. Keep up with the pruning yearly so that your tree can support heavy loads of fruit and any bad winter weather.
You can cheat a little and let one or two peaches form before the fourth year if you can’t wait; one or two won’t hurt anything.
Eventually, those first ripe peaches will arrive, and you’ll understand exactly why the work and wait was worth it.
Keep on growing!
References
- University of Maryland: comprehensive home growing guide
- University of Georgia: cultivar, care, site selection
- University of Illinois: varieties, pruning, care basics


4 thoughts on “Everything You Need to Know About Growing Peaches from Scratch”
Question: How do I break open the outer shell of the peach pit without damaging the seed?
The most effective way to crack open a peach pit without damaging the inner seed is to use a pair of locking pliers (vice-grips) or a bench vise to apply slow, controlled pressure. Place the pit in the jaws with the side seam resting against the gripping surfaces. You can also use a vise if you have one handy or last choice, use a hammer. Tap the side seam until it opens. Don’t hit too hard.
You’re putting the lid on the plastic container and then putting the dark towel on top of the closed container, correct?
Yes, if you are using a clear container, put the seed between the paper towels, then into the container, then a towel on it to keep it cool and dark. Thank you for visiting!