
Few houseplants are as adaptable as snake plants. Often called mother-in-law’s tongue, they tolerate low light, irregular watering, and dry indoor air with ease. But tolerating and thriving are two different things, and the difference comes down to a few simple habits.
You’ll learn:
- How to choose a snake plant variety.
- Why this plant needs a monthly bath.
- How to propagate and preserve different leaf patterns.
- How to keep snake plants happy for decades.
This guide covers everything you need to know to buy a snake plant, care for it, and propagate it.
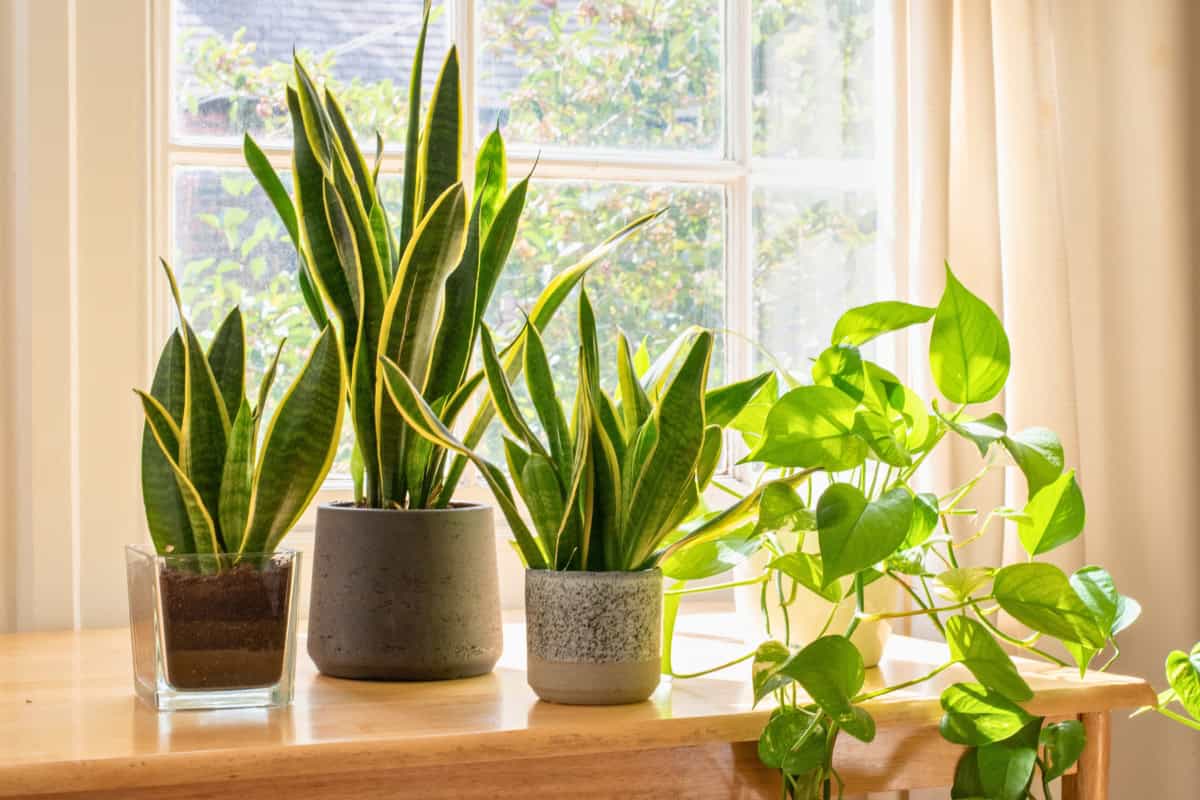
Step #1: Choose Your Snake Plant
Snake plants come in over 90 species and countless variations.
But before you settle on a single specific variety, it’s important to know snake plants were recently reclassified from Sansevieria to Dracaena, though many plant labels and garden centers still use Sansevieria.

Popular Snake Plant Varieties
- Laurentii: Green leaves with yellow edges.
- Moonshine: Silvery pale green leaves.
- Hahnii: Features compact rosettes.
- Cylindrica: Round, spear-like leaves.
- Whale Fin/Tail: Large, paddle-like leaves.
Note: Snake plants are mildly toxic to pets and children if ingested, so keep this in mind when selecting and placing your plant.
Healthy Snake Plant Checklist
To ensure you bring home a healthy plant, inspect the roots, leaves, and soil surface of any variety you’re considering before buying. Look for:
- Firm, upright leaves with no yellowing, soft patches, or black spots.
- Leaves that grow tightly together at the center.
- A thick, waxy surface cuticle.
- No signs of pests on leaf undersides or soil surface, like webbing (spider mites), white clusters (mealybugs), or hard bumps (scale).
- No actively rotting roots.
- Pups growing at the base (an early propagation bonus!).
Step #2: Prepare Your Pot and Soil
Snake plants store water in their thick leaves and roots, which makes them drought-tolerant. However, it also means they’re highly vulnerable when sitting in wet soil, so you’ll need to choose a pot and soil that offer fast drainage and good airflow.
Water should pass through freely, the roots should breathe well, and the soil should dry out between waterings.
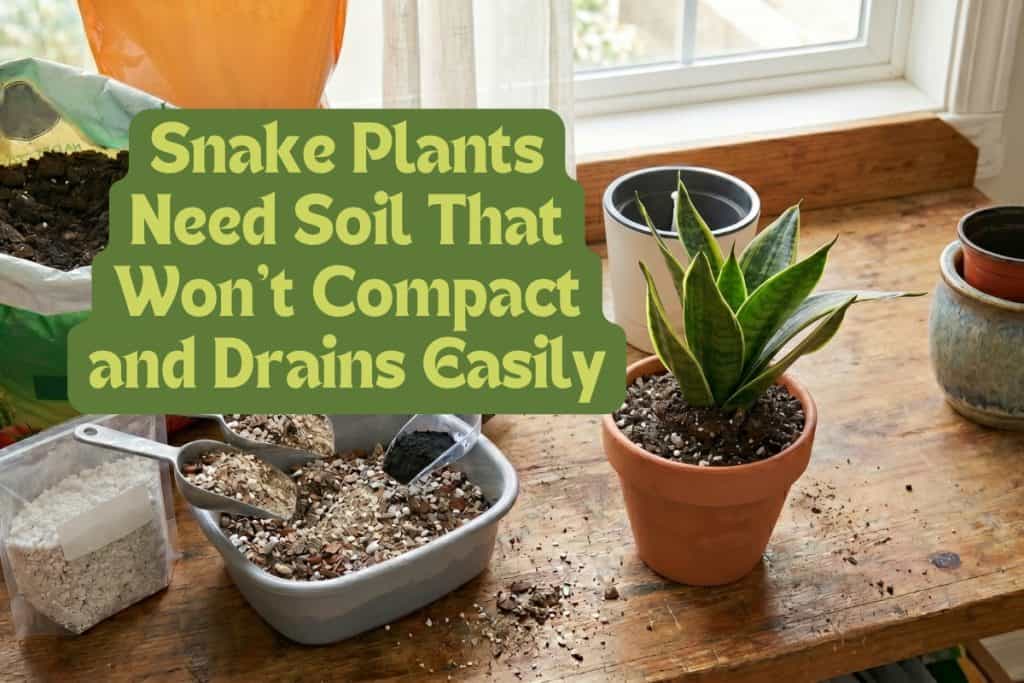
Resist the instinct to give your plant a large pot. Excess soil around a small root ball holds water long after the plant’s needs are met, and that constant wetness is where root rot begins for snake plants.
Snake Plant Soil Recipe
Start with this basic soil mix, which drains freely, resists compaction, and dries out at a pace that matches a snake plant’s natural conditions:
- 2 parts cactus or succulent mix.
- 1 part perlite, pumice, or coarse sand.
For extra airflow, add orchid bark. You can also add a small amount of activated charcoal; it’s optional, but it can absorb impurities and may help suppress some soil-borne pathogens.
Never use garden soil or heavy compost-based mixes. These compact over time, hold water, and restrict root airflow.
6-Step Checklist for Snake Plant Pots and Soil
- Choose a pot with drainage holes so water can exit easily.
- Terracotta or unglazed clay is ideal; porous walls allow soil to dry evenly.
- Avoid self-watering pots with wicks unless using an extremely fast-draining mix in a very bright spot.
- Use decorative pots without drainage as a sleeve only and remove the inner pot to water.
- Pot should be 1 to 2 inches wider than the plant’s root ball.
- Mix your own soil or use a quality cactus/succulent mix straight from the bag.
Step #3: Position and Plant
Where you position your snake plant and how you pot it will determine its growth rate, leaf color, and long-term health. So, both decisions are worth getting right before you begin.

How Much Light Does a Snake Plant Need?
Bright, indirect light for at least 6 hours a day is ideal for snake plants.
They will tolerate low light, but in dim conditions growth slows dramatically and leaves become paler and less vivid. It might put on 1 to 2 leaves per year instead of several.
For another tropical plant with specific light needs, read our pineapple guide here.
Where to Place a Snake Plant
- East- or west-facing windows are best.
- If you choose a south-facing window, set the plant 2 to 3 feet away from the glass.
- An LED grow light is a low-light alternative; set on a 12– to 14-hour daily cycle.
If you notice pale, washed-out, or yellowing leaves, these are signs your snake plant is getting too much light.
Snake Plant Temperature
Snake plants are tropical and naturally dislike the cold. So, you’ll need to keep your plant between 55 and 80 degrees Fahrenheit.
Don’t let temperatures drop below 50 degrees. You should also avoid cold windowsills in winter, drafts from air conditioning vents, and exterior doors. Cold surface temperature can damage roots, though your plant won’t show symptoms for weeks.
How to Plant a Snake Plant
Once you have chosen your location, it’s time to plant. Follow these steps:
- Add soil to the base of the pot.
- Set the plant inside. The top of the root ball should sit 1 inch below the rim, with the lowest leaves just at the soil surface.
- Firm the soil gently around the roots to eliminate air pockets.
- Put a newly-planted or repotted snake plant in bright indirect light for 1 to 2 weeks.
- After 2 weeks, move the plant to a sunnier spot.
- Rotate the pot a quarter turn monthly for even growth.
Step #4: Water Your Snake Plant
Snake plants evolved in arid regions where rain is unpredictable, so they developed thick, water-storing leaves specifically to handle long dry spells.
Unfortunately, that means too much water can do harm. Overwatering is the number one way people kill snake plants. By the time leaves yellow, turn soft, or collapse at the base, the damage is already severe.
Common Watering Woes
- Yellowing Leaves: A common early sign of overwatering.
- Soft or Mushy Leaf Bases: Indicates overwatering and root rot.
- Foul-Smelling Soil: A sign of root rot; requires trimming and replanting.
- Wrinkling or Curling Leaves: Indicates under-watering or root-bound.
When to Water Snake Plants
In spring and summer, you should check the soil weekly. Water your snake plant when the top 2 inches of soil are dry.
In fall and winter, check the soil every 3 to 6 weeks. Water only when the soil has dried out almost completely.
Thicker-leaved varieties hold more water and need less frequent watering than thinner-leaved ones.
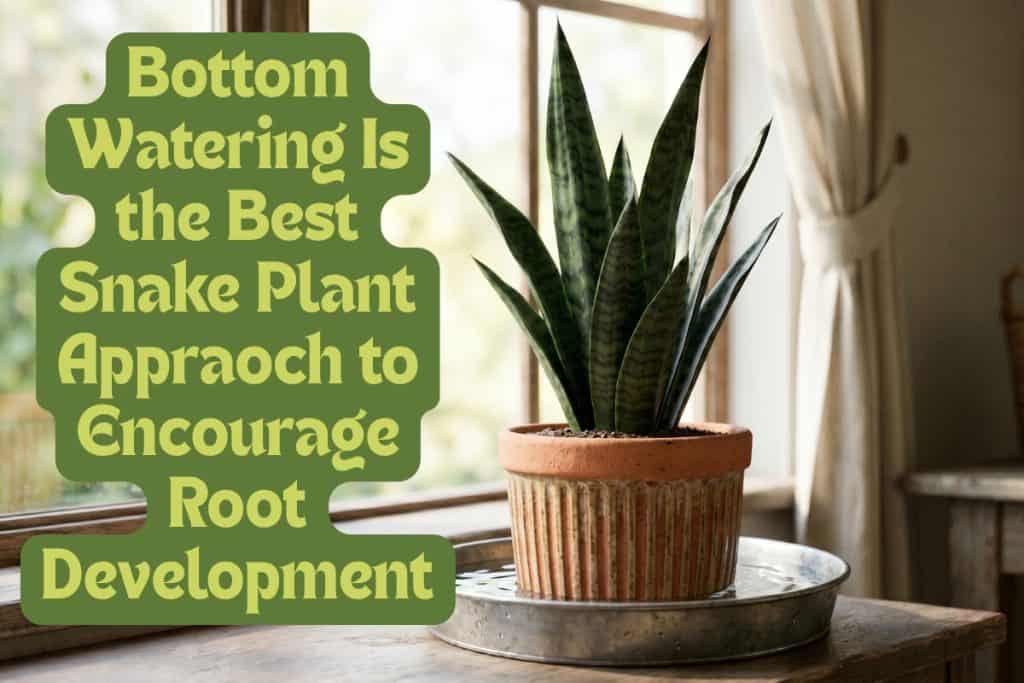
How to Water
When your snake plant’s soil feels dry (and not even slightly moist), you can either top water or bottom water the plant.
To top water, pour water slowly over the soil surface (not over the leaves or into the center rosette) until water flows freely from drainage holes. Empty the saucer after 30 minutes.
Bottom watering is preferred because it encourages deeper root development and keeps water away from the foliage and the base. To bottom water, set the pot in a shallow tray for 20 to 30 minutes. Remove and drain fully before returning the plant to its spot.
No matter which method you choose, make sure to use room-temperature water. Filtered water is preferable if your tap water is heavily chlorinated.
Step #5: Maintain Your Snake Plant
Snake plants don’t need constant attention, but they can suffer problems like dust buildup, nutrient depletion, and pests over time.
Sticking with a short maintenance routine every few weeks will keep your plant looking its best and growing efficiently.
Cleaning Snake Plants
Clean leaves absorb light more efficiently, so grab a microfiber cloth and wipe them down every few weeks.
- Wipe each leaf every 2 to 3 weeks.
- Use a damp cloth, plain water, or a very diluted drop of dish soap.
- Support the leaf with one hand while wiping to avoid snapping it at the base.
For another easy-care houseplant, read our money tree growing guide here.
Fertilizing Snake Plants
Snake plants are adapted to nutrient-poor soils and will survive without fertilizer, but a light boost during the growing season supports new leaves, richer and darker color, and better leaf structure.
From spring through late summer, aim to feed your plant once a month with a balanced liquid fertilizer (10-10-10) or a similar NPK formula diluted to half the recommended strength. Diluted worm castings or liquid seaweed are good natural alternatives.
Skip fertilizing entirely in fall and winter. Wait at least 6 to 8 weeks after repotting before feeding.
A white, crusty residue on the soil surface or pot edges suggests salt buildup from fertilizer or hard tap water. Flush the soil thoroughly with plain water for several minutes if this appears.
Learn about another plant that benefits from careful feeding and read our hydrangea guide here.
Do Snake Plants Need Pruning?
Snake plants respond well to the removal of damaged or unsightly leaves, and doing so benefits the plant’s overall health.
Pruning is simple: Remove yellow, browned, or soft leaves at soil level using clean, sharp scissors, cutting as close to the base as possible.
If just the leaf tips have browned, you can trim brown leaf tips by cutting at a slight angle to copy the natural leaf shape.
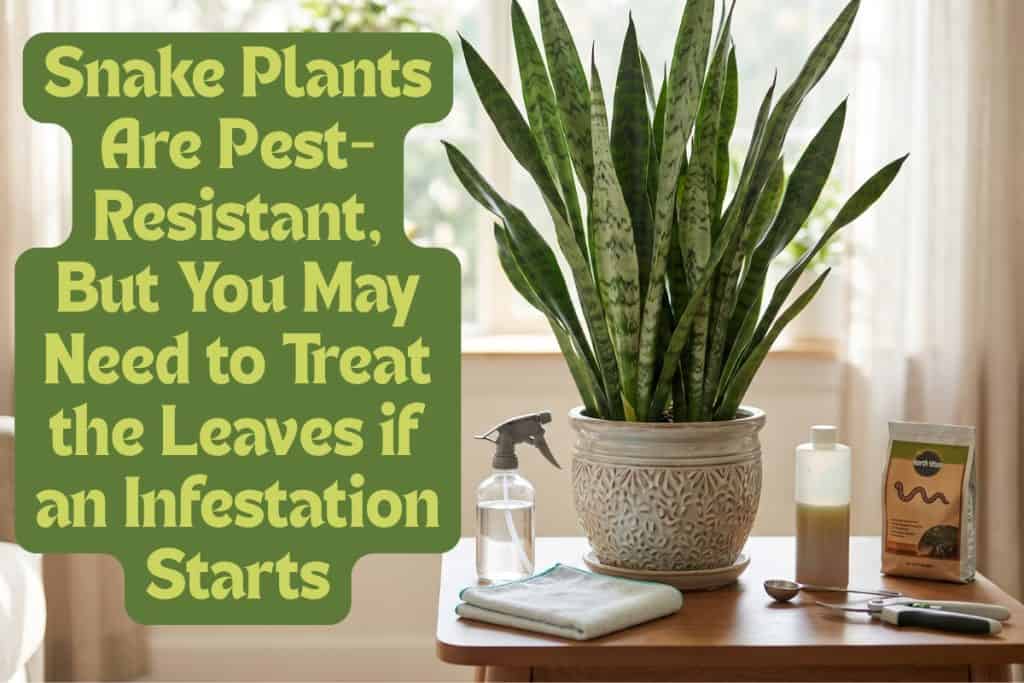
Controlling Pests
Snake plants are pest-resistant, but they’re not completely immune. So, you’ll need to check leaf undersides, the soil surface, and the base of the plant regularly.
If you do notice a pest problem, isolate any affected plants from others. Common snake plant pests include:
- Mealybugs: Treat by dabbing with a cotton swab soaked in rubbing alcohol or spraying with insecticidal soap.
- Spider Mites: Treat with a strong spray of water followed by neem oil.
- Scale Insects: Scrape off manually and treat with neem oil.
- Fungus Gnats: A sign of persistently wet soil, not a pest infestation.
Good air circulation prevents most common pests. Stagnant air, or plants placed in corners without airflow, creates the undisturbed conditions insects need to establish colonies; a ceiling fan run occasionally should keep problems at bay.
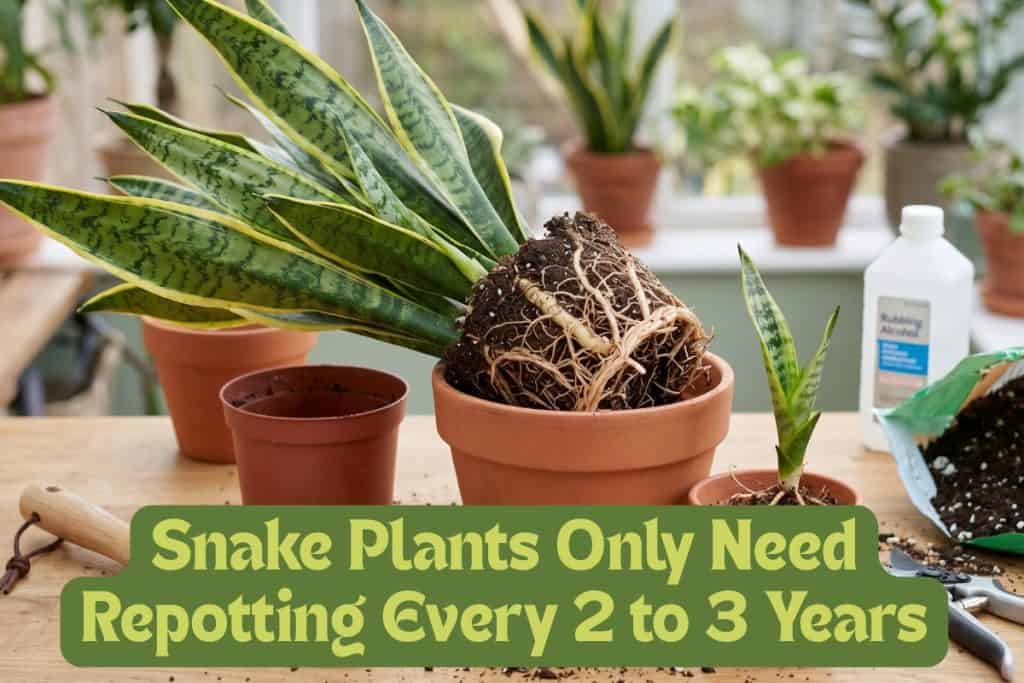
Step #6: Repot Growing Plants
Snake plants prefer being slightly tight in their pots, so you only need to repot them every 2 to 3 years in spring, or whenever clear signs appear. Refreshing the soil and giving roots more room typically triggers a noticeable flush of new growth.
Repot snake plants when you see:
- Roots emerging from drainage holes.
- Soil drying out within a day or two of watering.
- The pot visibly bulging or cracking.
How to Repot a Snake Plant
- Prepare Your Materials. Sterilize cutting tools with rubbing alcohol before use. Have fresh soil mix ready, and a new, 1- to 2-inch wider pot.
- Remove the Plant Carefully. Tip the pot onto its side and gently work the root ball loose. If it’s tightly root-bound, run a thin knife around the inside edge.
- Examine and Clean the Roots. Trim any black, mushy, or foul-smelling roots. If rhizomes are densely tangled, cut through them with a sharp, sterilized blade.
- Repot at the Correct Depth. Set the plant in the new pot so the base of the lowest leaves sits just at or slightly above the soil surface.
- Allow Recovery Time. Expect no visible new growth for several weeks after repotting; the plant is investing energy into root establishment first.
- Pause Fertilization. Wait 6 to 8 weeks before fertilizing.
What to Do With Pups While Repotting
If pups (small offshoots that grow from a snake plant’s base) are present when it’s time to repot, separating those pups is the least disruptive move.
Water, nutrients, and space are divided among multiple plants. By separating the pups and the mother plant, you give each one full access to its own resources.
Wait until pups are at least 3 to 4 inches tall with visible roots before separating.
Step #7: Propagating Snake Plants
Snake plants can be propagated in three ways:
- Division: The fastest method; it preserves specific traits like leaf patterns.
- Leaf Cuttings: A slow method that allows for multiple plants from one leaf.
- Seeds: Primarily used by plant breeders.
Division
Division separates pups (or young shoots) to create a clone that keeps the parent plant’s characteristics. This propagation method produces ready-to-pot young plants.
Here’s how to propagate snake plants via division:
- Unpot and gently remove soil to expose rhizomes and root clumps.
- With a clean, sharp knife or sterilized shears, cut the rhizome between the pup and the parent so the pup keeps its roots.
- Let the cut callous for a few hours in a dry, airy spot.
- Alternatively, because pups already have roots, you can pot immediately in a small container with a fast-draining mix.
- Water and place in bright, indirect light.
- Keep soil barely moist for the first couple of weeks.
- Return to normal watering when new growth appears.
Leaf Cuttings
Leaf cuttings are a slower propagation method, but this approach lets you produce several plants from a single leaf.
Use a healthy, mature leaf and follow these steps:
- Cut a healthy leaf cleanly at the base and slice it into 3- to 4-inch sections, keeping the bottom end clearly marked.
- Cut the base of each piece into a large V-shape to double the surface area to produce roots.
- Let sections callous for several hours or overnight in a dry, airy spot.
- Root in soil: Insert the bottom end about 1 inch into a moist, well-draining mix.
- Root in water: Stand the bottom end in a glass of clean water. Roots appear in 3 to 5 weeks. Change the water regularly.
- Loosely cover with a clear bag with a few holes to raise humidity (Optional).
- Keep plant in bright, indirect light.
- Transplant to soil when roots are approximately 1 inch long (about 4 to 8 weeks) and new growth appears.
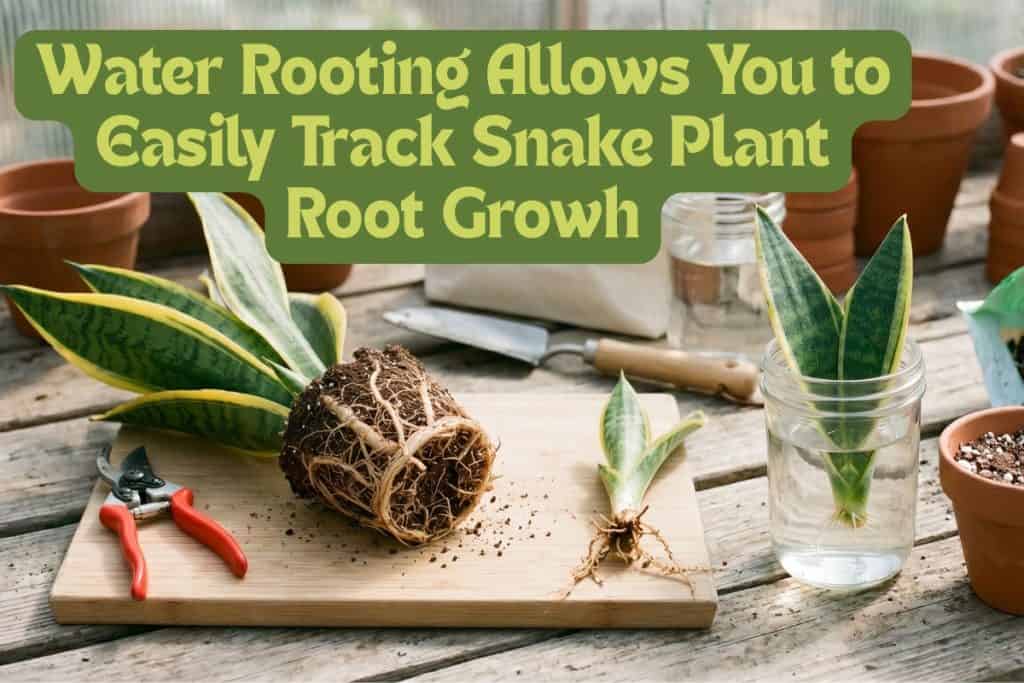
Water vs Soil Rooting: Which is Best?
There are pros and cons to water rooting and soil rooting propagated snake plants.
With water rooting, roots appear sooner. They’re also visible and easy to monitor.
Plants rooted in soil are slower to show roots, but this method is better for long-term establishment and reduces transplant shock.
Read about another plant that can be rooted in soil or water in our sweet potato guide here.
Do Snake Plants Have Health and Wellness Benefits?
Keeping a snake plant can have psychological benefits. Studies show that indoor plants in general reduce stress, improve mood, and support focus.
Best of all, snake plants deliver all of this with almost no effort on your part.

Snake Plants and Air Quality
Snake plants have been evaluated in several studies to determine their effect on air quality. The 1989 NASA Clean Air Study found that, in sealed laboratory chambers, snake plants absorbed specific airborne pollutants through their leaves.
The chemicals identified in this study include:
- Formaldehyde: Found in pressed wood, fabrics, and some cleaning products.
- Benzene: Present in glues, paints, and detergents.
- Trichloroethylene (TCE): Used in printing inks, varnishes, and adhesives.
- Xylene: Common in rubber, leather, and tobacco smoke.
It’s important to know that those results came from small, sealed chambers with no natural ventilation like a house. Research after the NASA study found you would need a minimum of roughly 10 plants per 11 square feet to achieve meaningful air purification, which is an impractical number for most households.
That said, snake plants are still a good choice for indoor spaces. For example, they take in carbon dioxide and release oxygen at night instead of during the day. This can make them a nice plant for bedrooms, although they do not replace proper ventilation.
Where to Place Snake Plants
You can position snake plants in rooms where you spend the most time, like bedrooms, living rooms, and home offices. Freshly-painted or refurbished rooms are especially good candidates, where off-gassing from new materials is at its highest in the first weeks.
Think of the air-quality improvement as a secondary bonus. The primary benefit is the calm a snake plant brings to your space.
Final Advice
Snake plants are among the easiest houseplants you can own. Water them when the soil is dry, and remember those thick leaves are already full of water, so restraint matters more than frequency. Get the drainage right, give them decent light, and they’ll reward you for decades.
Pick out a couple of varieties you like, try propagating them, and then start filling up those windowsills and breathing better.
Happy growing!


10 thoughts on “Snake Plants 101: The Complete Guide to Buying, Caring, and Propagating”
Is it helpful to add dry coffee grounds to the soil of snake plants?
It can be helpful, but not necessarily so I won’t suggest it. Coffee grounds make the soil more acid. Without knowing what the soil pH is to start with you can be messing up an already good pH or making an acid pH worse. Using them outside in a larger area is a better move. Thank you for visiting.
My dad gave me a snake plant just before he died. My partner has forgot to water it so I am trying to bring it back to life. Your information is valuable. Thank you, Sandra.
I hope you can bring it back! Cut off a few pieces of where it still looks good and start a new plant just in case.
My snake plants leaves are flopping to each side. Previously, I transplanted to a larger pot, realized it was a mistake and then transplanted it back to the original pot (plastic with drainage). Some leaves are turning brown from the middle out, while others are turning completely yellow and are very soggy. I’m not sure what to do at this point.
Browning from the middle of the leaf outward (rather than starting at the tip) can also indicate overwatering or rot, since it suggests internal tissue breakdown rather than just dry edges. Snake plants can show transplant shock on its own (without rot). leaf yellowing or flopping just from root disturbance, even if the roots are otherwise fine. The soggy texture is the more specific tell for rot; shock alone usually doesn’t make leaves feel waterlogged. – I wouldn’t stress it anymore. Just don’t water it unless it is completely dry. Put in a chopstick and make sure it comes out clean. The leaves that are floppy may or may not ever stiffen up. I would cut up a good looking leave into about6 pieces and start a new plant as a backup and just keep the original plant very dry. Best wishes.
Hello,
This was a wonderful resource. Thank you so much! I have many snake plants in my house. My “problem” is that they are ridiculously tall. Some are about 4ft tall. I was pls Ning on dividing and repotting some, but I don’t think I can put them in little pots like you illustrate in this article. Any suggestions for the best size/shape pot to put them into?
Thank you again! I love my snake plants and want to see them continue to thrive.
Karin
Any smaller pots will work. Since you will have several cuttings and can put 6+ cuttings per pot, I would go wider than deep. A 4-6 inch wide pot with several cuttings would look great.
Thank you for your advice on working with snake plants. I hope to incorporate many of your suggestions to help my snake plants recover. Happy growing!
Thank you for visiting. I love snake plants and have had tons through the years. It’s a cheap gift to give someone a snake plant with 5-6 leaves and all you did was cut off one of yours and start several new ones. Enjoy your plants.