
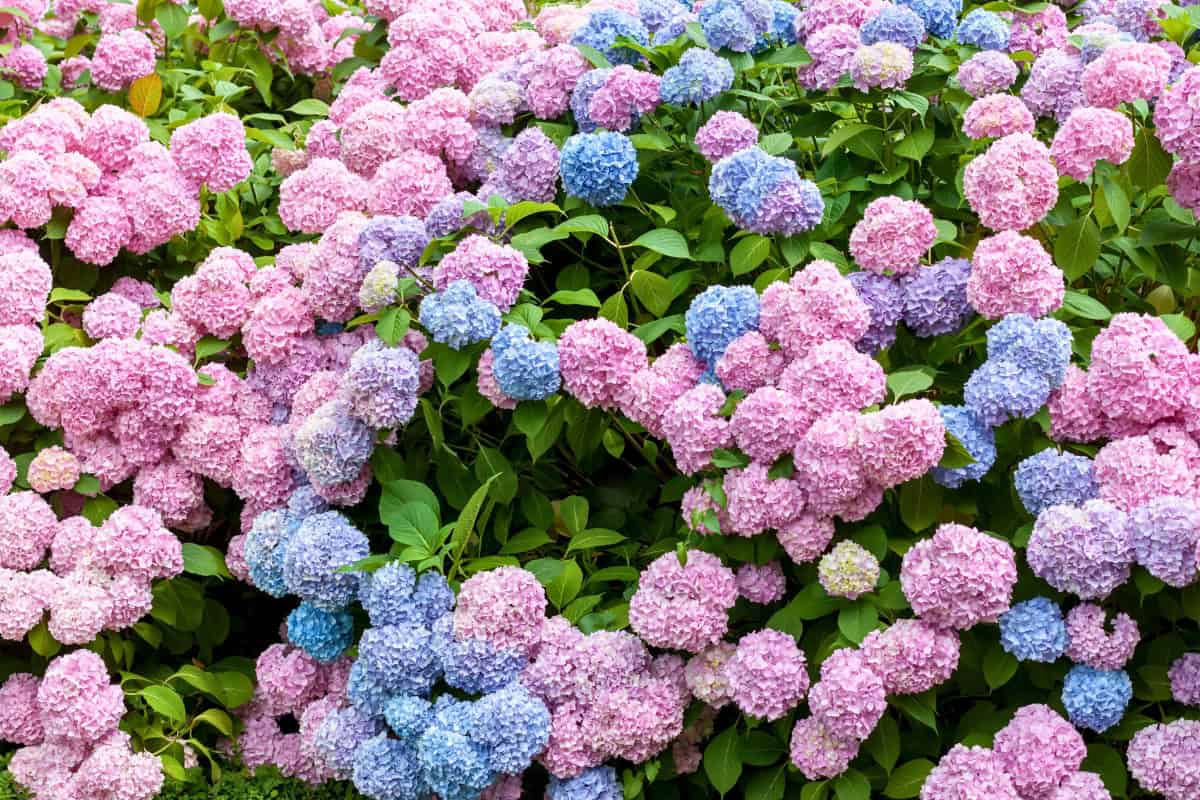
Hydrangeas are one of the most popular, beautiful, and confusing landscape shrubs, but they can be surprisingly tricky to grow. That’s because the name “hydrangea” actually includes six different species that look different and require different growing conditions.
If you don’t know what type of hydrangea you have, you might wind up with a shrub full of leaves (and no flowers). So in this guide, we’re walking you through everything you need to grow healthy, blooming hydrangeas:
- Choosing the right hydrangea
- Long-term hydrangea care
- How to plant for the best results
- Watering, light, and soil basics
- How to change bloom color
Let’s get started!
Step #1: Select a Hydrangea Variety
In order to get hydrangeas growing and blooming, you’ll need to know what species and variety you’re working with. The specific hydrangea type you choose will determine your planting and care decisions.
A hydrangea’s species and variety will determine details like whether flower buds are set on last year’s stems or this year’s growth; when the plant blooms; and light and temperature needs.
6 Most Common Types of Hydrangeas
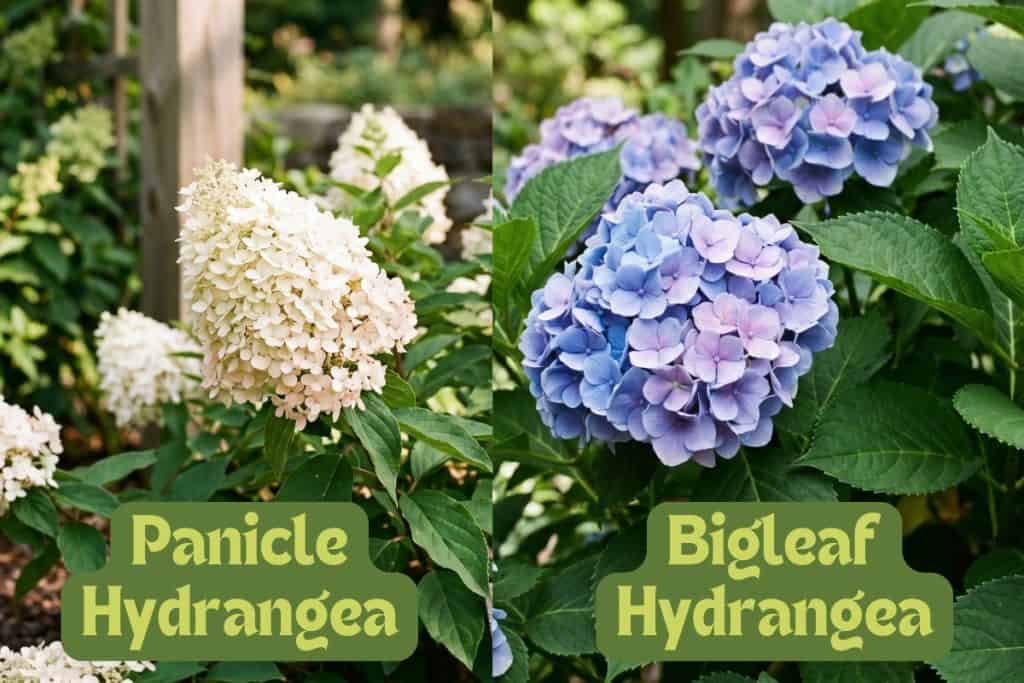
- Panicle Hydrangea (Hydrangea paniculata): Cone-shaped blooms in mid–late summer on new wood; very cold-hardy, sun-tolerant, and versatile in size
- Smooth Hydrangea (Hydrangea arborescens): Large white to pink snowball blooms in early summer on new wood; flower color not affected by soil pH
- Bigleaf Hydrangea (Hydrangea macrophylla): Blue to pink mophead or lacecap blooms in early summer on old wood; less cold-hardy
- Mountain Hydrangea (Hydrangea serrata): Mostly lacecap blooms in early–mid summer on old wood; color changes with soil pH
- Oakleaf Hydrangea (Hydrangea quercifolia): Cone-shaped white, pink, or red blooms in early–mid summer on old wood; distinctive oak-like leaves
- Climbing Hydrangea (Hydrangea anomala spp. petiolaris): White lacecap blooms in late spring–summer; climbs using aerial roots on walls and trellises
Work Backward to Choose the Right Plant
If you’re wondering how to choose a hydrangea plant from these many different varieties, consider starting with your preferences. For example:
- An easy-to-grow option → Panicle hydrangea
- Soft, full, easy-to-prune blooms → Smooth hydrangea
- Blooms change to blue or pink → Bigleaf or mountain hydrangea
- Delicate lacecap blooms or a smaller plant → Mountain hydrangea
- Four-season interest with fall color → Oakleaf hydrangea
- For the shady side of a house → Climbing hydrangeas
For more on structural plant design, discover our 8 steps to bonsai success here.
Step #2: Select a Planting Site
Think hydrangeas need shade? That’s merely a myth. Most hydrangeas can handle more sun than gardeners expect, though the amount does vary across varieties. In fact, too much shade is a common reason hydrangeas fail to bloom.
For most hydrangeas, an ideal location provides morning sun and dappled afternoon shade.

Hydrangea Light Needs
Here’s a look at which types need full sun (six or more hours of direct sun per day) or partial sun (four to six hours):
- Panicle Hydrangeas: High tolerance for sun and heat
- Smooth Hydrangeas: Tolerates full sun in cooler zones
- Bigleaf Hydrangeas: Prefer morning sun with afternoon shade in hot climates, or partial sun in cooler climates
- Mountain Hydrangeas: Requires afternoon shade in warm climates
- Oakleaf Hydrangeas: The most shade-tolerant, though flowering improves with more light
- Climbing Hydrangeas: Likes full sun in northern climates and shade in the south
Don’t overlook air circulation, either; it’s equally important. You should plant hydrangeas in a spot with good airflow to reduce the risk of powdery mildew and other fungal problems.
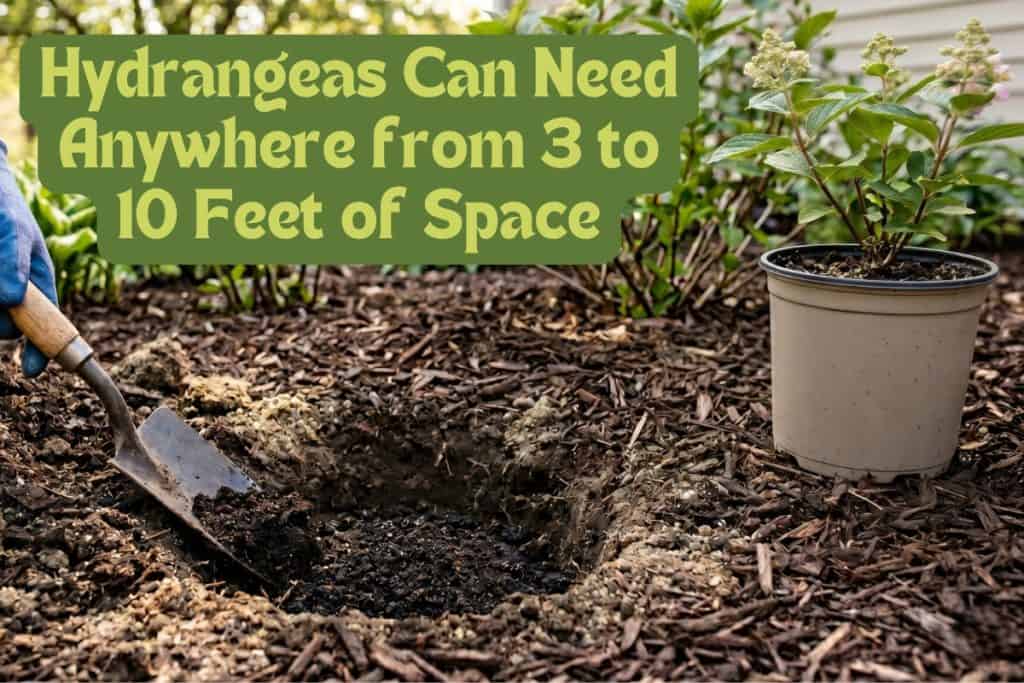
Don’t Forget About Space
Hydrangeas require space wherever they’re planted, though plant spacing depends on the variety you choose and your climate.
For example, bigleaf hydrangeas typically need around 3 to 4 feet of space, while panicle hydrangeas may need closer to 6 to 10 feet. Make sure to consider the space requirements of your variety before choosing a planting location.
Since proper sun exposure ensures fruit, view our guide to growing peaches from scratch here.
Step #3: Prepare the Soil
Soil preparation before planting is one of the highest-return investments, as it pays off in healthier plants for years to come. Hydrangeas need soil that drains well but keeps enough water to stay consistently moist.
Soil Dos and Don’ts
Before you get planting, check your soil and keep these tips in mind:
- Avoid planting in low spots where water collects.
- Native soil that drains well may not need amending.
- Do not add fertilizer to the soil before planting.
- After digging a hole, return at least half of the original soil.
Because healthy soil is the foundation for high-yield harvests, I invite you to read how to grow your best potato crop ever here.
Does Your Soil Drain Well?
Soil that stays waterlogged causes root problems that are difficult to correct later. Before planting your hydrangeas, you can perform a test to check drainage.
Dig a hole and fill it with water. If water sits in that hole for over 2 hours without draining, find another location.
Alternatively, you can amend the soil with fast-draining material like coarse sharp sand. Just don’t use fine sand; it will work the opposite and compact the soil.
Mixing in compost, leaf mold, or other organic matter can also help improve drainage and fertility. Working organic matter into the planting area improves both clay and sandy soils. However, be aware that peat moss has a pH of 4 to 5, so it could affect your bloom color.
In addition to testing your soil’s drainage, you may also want to perform a soil test to find out the pH. Otherwise, you’re simply guessing what your plants need. I recommend testing before planting, then every two years.
Step #4: Plant Your Hydrangeas
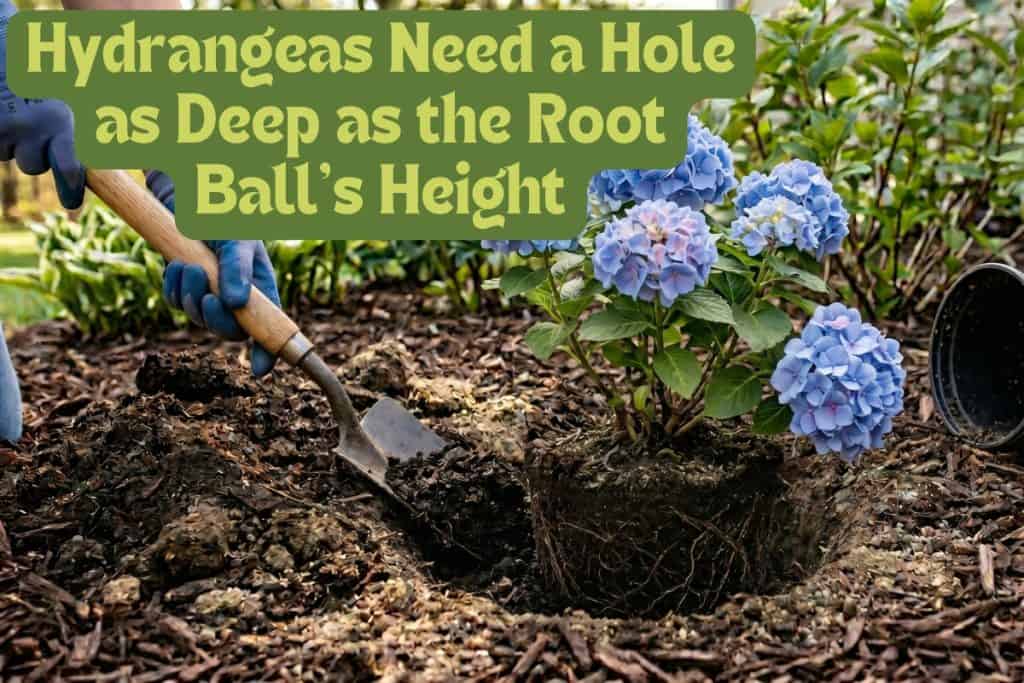
Proper hydrangea planting includes two important variables: hole size and planting depth. Get both right, and your plant should establish quickly. Get either wrong, and you’re inviting problems from the start.
Spring and fall are the best planting times, when cooler temperatures and increased rainfall reduce transplant stress.
Planting Protocol
- Dig a hole at least twice as wide as your hydrangea’s root ball, but no deeper than the root ball’s height.
- Set the plant in the hole so the crown (where stems meet roots) sits level with or slightly above the surrounding soil.
- Use the nursery pot as your depth guide; the soil line on the pot should match the soil line in the ground.
- Backfill using a mix of the original soil and any amendments, then firm gently to eliminate air pockets.
- Water deeply after planting to settle the soil and ensure root-to-soil contact.
After mastering these planting steps, learn how to care for blooming orchids here.
Step #5: Water Your Hydrangeas
Consistent moisture is critical to hydrangea health, particularly during the first two years when the root system is establishing. Young plants have a shallow, limited root zone and cannot access water like a mature plant, so consistent moisture is the goal.
Because conditions vary widely by soil type, sun exposure, climate, and plant age, no single gallon-per-week rule applies. Instead, it’s better to learn the signs of water stress.
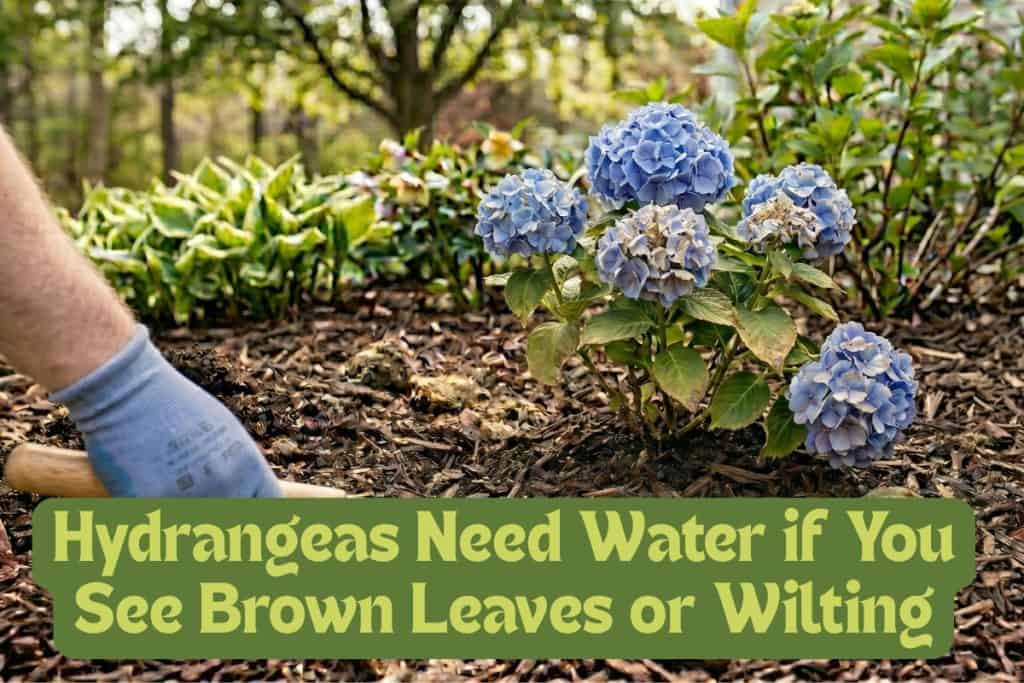
Signs You’re Under-Watering
If your hydrangea is drying out, you will first see crispy brown leaf edges or margins.
In prolonged heat, the plant may wilt mid-day, then perk up again later. If it’s still wilted in the evening after temperatures drop, water immediately.
Signs You’re Over-Watering
Over-watered hydrangeas appear yellow and off-color. Foliage becomes droopy and soft rather than crisp.
Additionally, the soil may stay wet and fail to drain well around the root zone.
Best Hydrangea Watering Practices
- Deep, infrequent watering encourages roots to grow downward and stronger.
- Shallow, frequent watering keeps roots near the surface and vulnerable to stress.
- Water at the base, not overhead.
- Use mulch to keep roots cooler and slow moisture loss.
- Hydrangeas in full sun and containers need extra monitoring.
- Avoid wetting white blooms to prevent browning petals.
Precise moisture levels are a common challenge; check out our complete guide on how to grow a money tree here.
Step #6: Add Mulch
Mulching and watering work together to help hydrangeas thrive. A 2 – to 3-inch layer of mulch acts as a blanket on top of soil, slowing moisture evaporation from the root zone. It also moderates soil temperature, keeping roots cooler in summer and warmer during fall.
Mulch is also a simple way to control weeds. Weeds compete with hydrangeas for water and nutrients, and a good mulch layer prevents many of them from taking hold. That matters because pulling established weeds can disturb hydrangeas’ shallow roots.
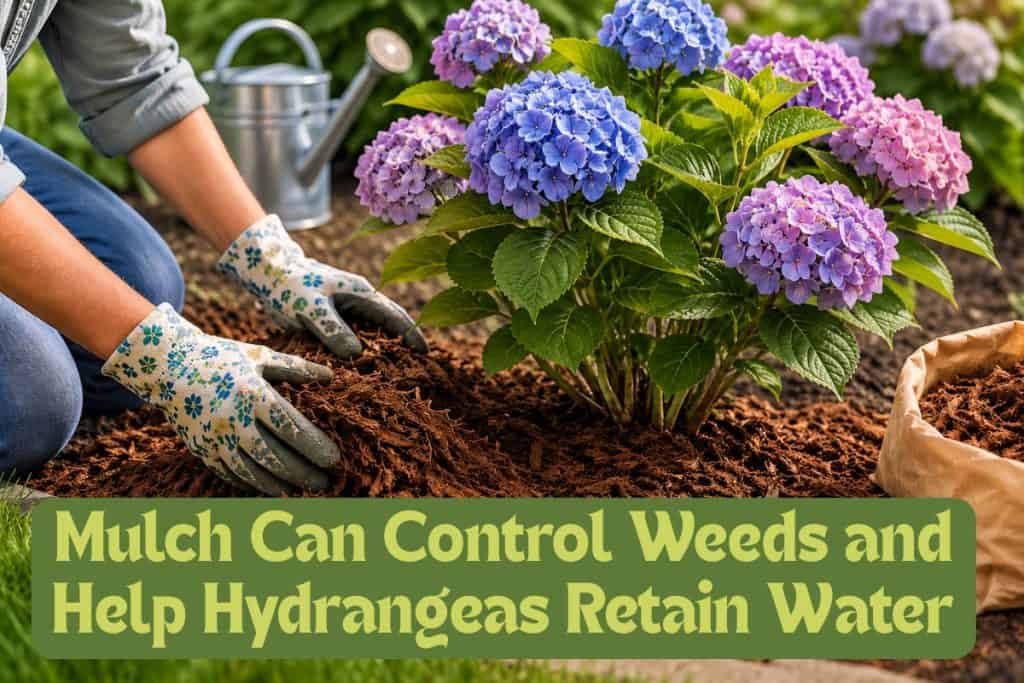
The Basics of Mulch
- Use Natural Mulch: Avoid brands that use colorants that can bleed or affect shallow-rooted plants.
- Avoid Mulch With Weed Pre-Emergent: This can inhibit shallow hydrangea roots.
- Apply a 2- to 3-Inch Layer: Add organic mulch around the base of the plant, starting 2 inches from the crown and covering to the drip line.
- Wait Until Soil is Warm: If spring planting, don’t mulch over cold, wet soil.
- Opt for Organic: Organic mulches like pine straw and shredded bark will eventually enhance your soil.
Since mulching boosts plant quality, get tips for growing professional-quality tomatoes here.
Step #7: Fertilize Your Hydrangeas
Hydrangeas benefit from fertilization, but it’s easy to over-fertilize them, especially if your approach includes excess nitrogen. Nitrogen promotes foliage growth, not flower production.
A balanced, correctly-timed approach to fertilizing hydrangeas supports both healthy growth and showy blooming. There are special “Bloom Booster” fertilizers formulated for hydrangeas that make it easy to apply the best formulation for your plant.
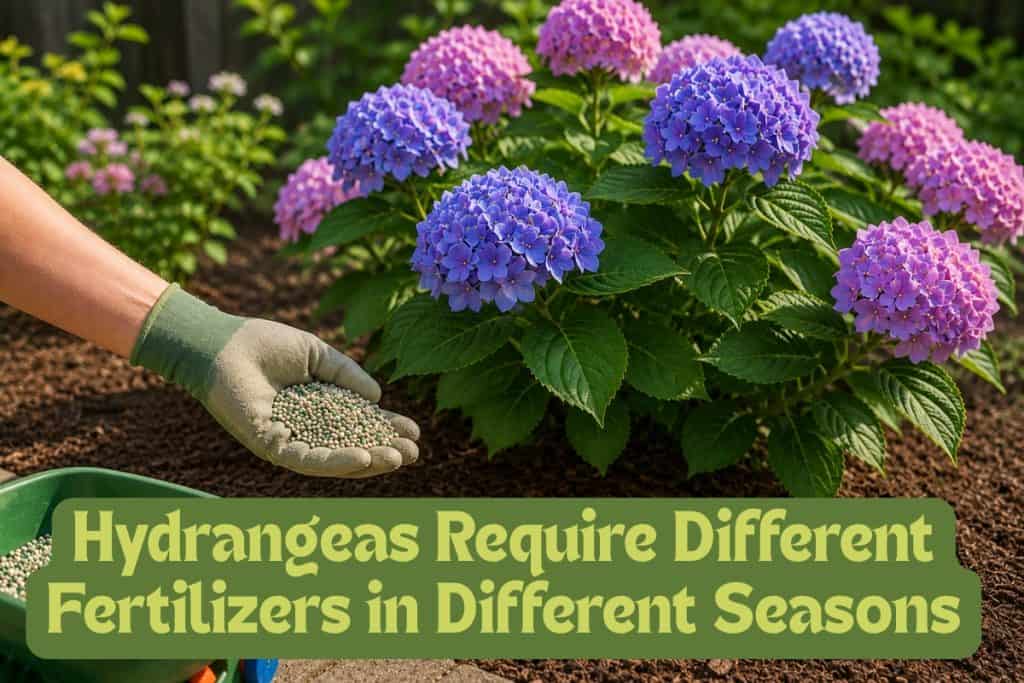
Fertilizer Checklist
- Apply balanced, slow-release fertilizer (such as 10-10-10) in early spring as new growth emerges.
- Do not fertilize after midsummer; late-season feeding stimulates soft new growth that won’t harden before frost.
- Avoid lawn fertilizers near hydrangeas, as nitrogen runoff causes leafy, flowerless plants.
- For container-grown hydrangeas, apply a second light application approximately six to eight weeks after the spring application.
Adjust Soil pH to Change Flower Color
Adjusting the pH of the soil you’re growing your hydrangeas in can do something unique: It can actually change the color of your blooms. This applies specifically to bigleaf and mountain hydrangeas.
Hydrangea flowers, which range from deep blue to bright pink, get their color from aluminum in the soil. The soil’s pH controls whether those ions are available for the plant to absorb. Think of pH as a filter that either lets aluminum be absorbed or blocks it.
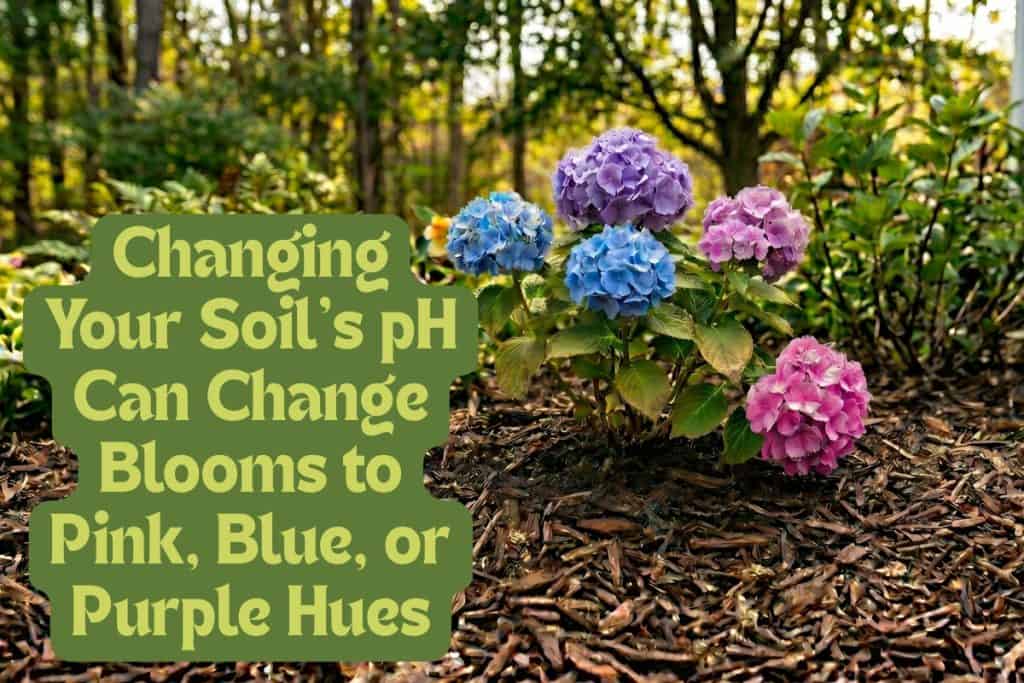
In acidic soil (pH 5.5 and below), aluminum becomes available, and the plant produces blue flowers. In alkaline soils (pH of 6.5 and above), aluminum is chemically unavailable, so flowers are pink.
Soil with a pH between 5.5 to 6.5 produces purple and mauve flowers, as the plant receives intermediate aluminum levels.
How to Change Hydrangea Flower Color
- For blue flowers, work aluminum sulfate into the soil in early spring.
- For pink flowers, apply garden lime to raise soil pH.
- Aluminum sulfate drenches can shift bloom color in a few weeks.
- Slower-acting amendments may take a full growing season to show results.
- Adjusting pH doesn’t affect panicle, smooth, or oakleaf hydrangeas.
- You can only change the color of future buds, not existing flowers.
For more specialized soil projects, uncover how to grow ginger at home here.
Consider a Natural Soil Amendment
Instead of reaching for a store-bought soil solution, you can look in your kitchen for a natural one: Your leftover coffee grounds.
Used coffee grounds are slightly acidic and can slowly shift hydrangea flowers towards the blue bloom range. Even better, they feed your soil with organic matter and support microbial health.
Plus, it’s easy to apply. Scatter a thin layer of grounds around the base of your hydrangeas two to four times a year.
How to Prune Hydrangeas
When it comes to pruning hydrangeas, timing is essential. Cut your plant at the wrong time, and you’ll eliminate your blooms.
The key is to understand whether your hydrangea blooms on old wood (stems that were produced last year) or new wood (produced in the current growing season).
Just note: Even correct pruning won’t prevent hydrangeas from losing flower blooms to late frosts, heavy snow, deer browsing, or accidental breakage during yard work.
Old Wood Hydrangeas
The following hydrangea types bloom on old wood:
- Bigleaf
- Mountain
- Oakleaf
These varieties set their flower buds in late summer and fall on stems from the current year. Those buds overwinter and open the following season.
Prune these hydrangeas immediately after flowering in summer. This is the only window in which you can safely prune without sacrificing next year’s buds.
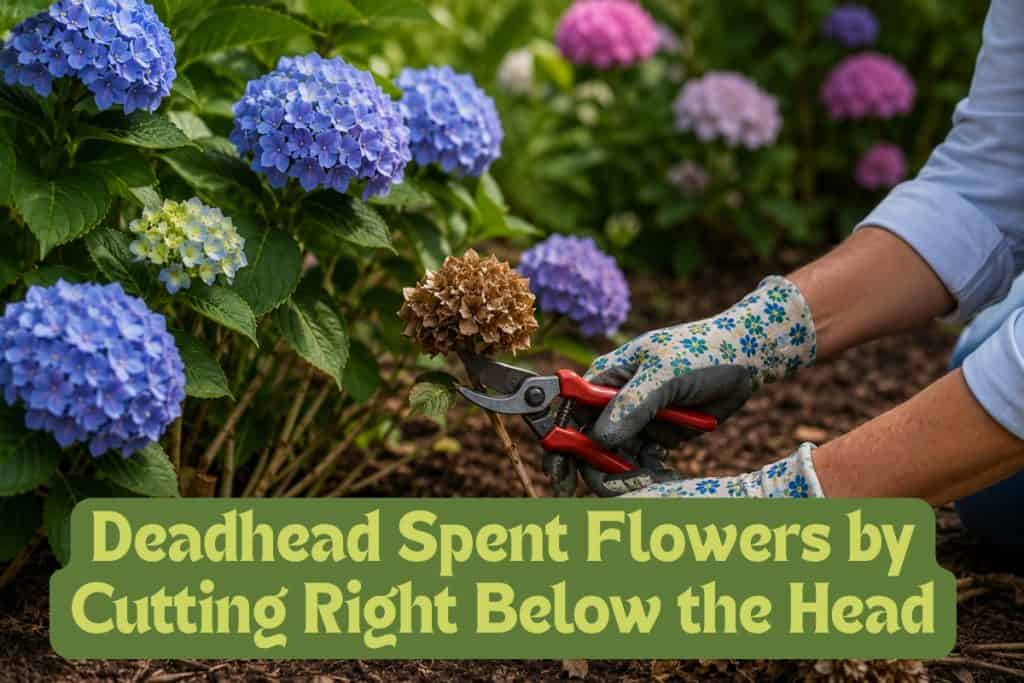
Pruning and Deadheading Old Wood Hydrangeas
- Deadhead spent blooms by cutting just below the flower head, above the nearest pair of healthy leaves.
- Remove anything dead, damaged, or diseased.
- Cut back hard only if the plant is extremely overgrown.
- In cold climates, wait to cut frost-damaged stems until spring, when you can see exactly what is dead, then remove stems just above the highest swollen bud.
New Wood Hydrangeas
Panicle and smooth hydrangeas bloom on new wood, producing fresh flowering stems each spring.
These varieties are forgiving and respond well to harder pruning. The harder you cut, the larger the blooms. Cutting lighter will produce more flowers, but those blooms will be smaller in size.
On panicle and smooth hydrangeas, leaving dried blooms adds ornamental value. These can be removed during pruning in late winter.
Pruning New Wood Hydrangeas
- Prune in late winter to early spring, before new growth begins.
- Cut smooth hydrangeas to 12 to 24 inches from the ground in late winter.
- Cut panicle hydrangeas by removing one-third of the growth, cutting just above outward-facing buds.
- Never cut panicle types all the way to the ground; this produces weak stems that cannot support flower heads.
The “Green Test” for Dead Wood
Unsure whether a stem is alive? Scratch the bark lightly with your fingernail.
A thin layer of green beneath the surface means it is alive. If it’s dry, brown, or hollow underneath, it’s dead and should be removed cleanly at its base.
Common Hydrangea Pests and Diseases
Hydrangeas are naturally tough plants, but a few common pests and diseases can affect their appearance and health.
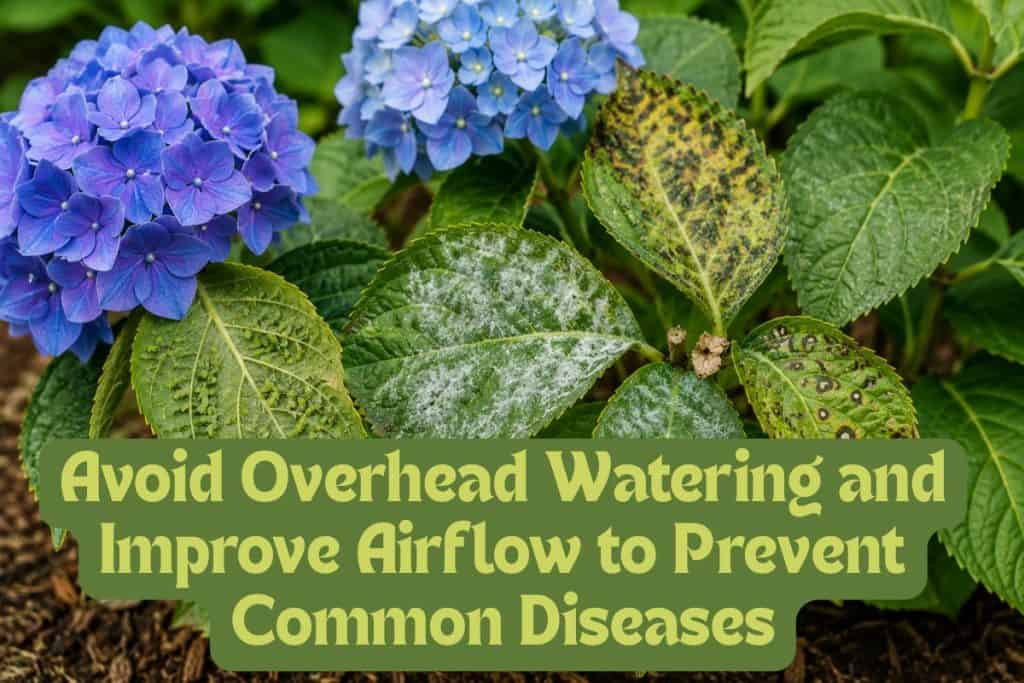
Most are preventable with good habits. For example, you should avoid overhead watering and ensure adequate airflow through proper spacing and pruning.
The most common issues to watch for are insect pests, fungal diseases, and deer damage. Hydrangeas, especially the bigleaf variety, are a favorite meal for deer. If deer are a problem in your area, protecting old wood hydrangeas through the dormant season and into spring is important.
Pests
Aphids and spider mites both target soft new growth on hydrangeas. Aphids cluster on stems and leaf undersides, while spider mites leave fine webbing and stippled, dusty-looking leaves.
Both multiply quickly and feed by sucking chlorophyll from leaves. Start control with a strong stream of water; if they persist, apply neem oil at label rates.
Diseases
Cercospora leaf spot is the most common fungal issue for hydrangeas; it appears as spots with a reddish-purple border and a gray or tan center. It won’t kill your plant, but it can weaken it.
Powdery mildew appears as a white or gray powder on otherwise healthy leaves. It’s triggered by warm days with cool nights, high humidity, and poor air circulation. To combat it, water plants at the base and keep foliage as dry as possible.
If you improve airflow, avoid wetting foliage, and remove infected leaves quickly, fungicides are rarely needed.
How to Protect Hydrangeas in Winter
In regions where temperatures regularly fall below 14 degrees Fahrenheit, bigleaf and mountain hydrangeas need winter protection. Panicle and smooth hydrangeas do not need winter protection.
Their flower buds remain exposed through winter, so hard freezes without insulation can kill those buds and your chances of a spring bloom.
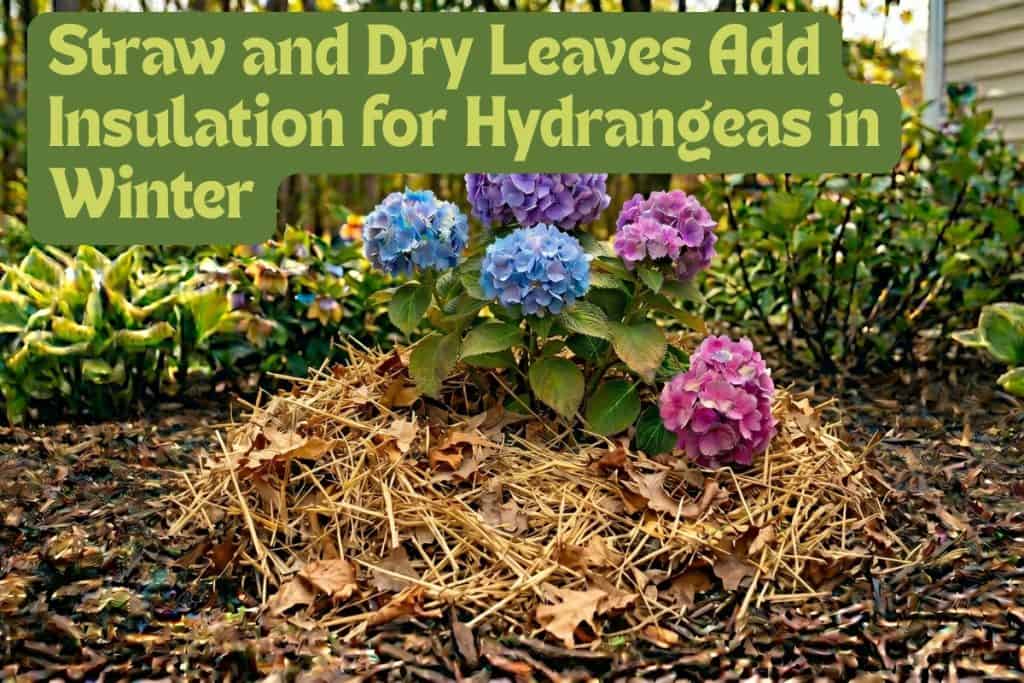
The Best Winter Protocol for Hydrangeas
- Wait until the ground has frozen before applying protection.
- Pile straw, dry leaves, or pine needles loosely around the base to a depth of 8 to 12 inches to insulate the crown and lower stems.
- For added protection, wrap plants loosely in burlap or place inside a wire tomato cage and fill the interior loosely with straw or leaves.
- Remove protection gradually in early spring, once overnight temperatures stay above freezing.
Caring for Container Hydrangeas
When garden space is limited or in-ground planting isn’t possible, growing hydrangeas in containers is a practical option. Container planting also gives you greater control over growing conditions, making it easier to manage soil, drainage, and sun exposure.
However, container-planted hydrangeas do demand more attention. Their confined roots dry out faster and get hotter in summer and colder in winter than in-ground. Increased watering means nutrients will need to be replaced more frequently, too.
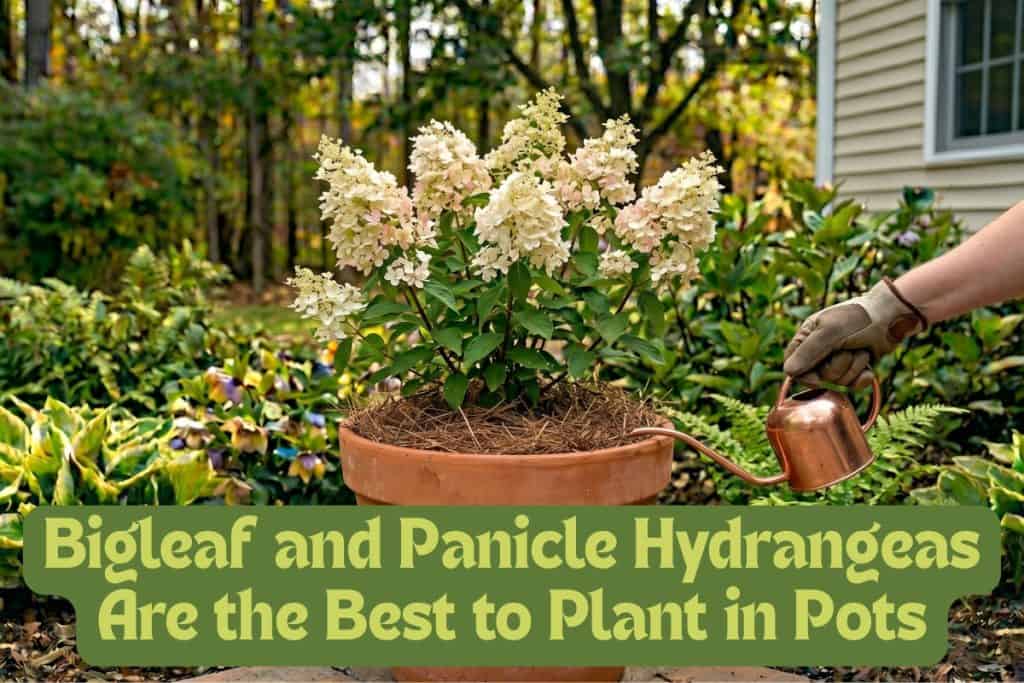
The Best Hydrangeas for Container Planting
These hydrangea varieties are the best candidates for pots:
- Bigleaf hydrangeas
- Panicle hydrangeas, especially compact forms
- Some mountain hydrangeas
Oakleaf and climbing hydrangeas are not good choices for containers because of their size and root systems
Once you’ve chosen the right variety, you need a consistent care routine to keep a potted hydrangea healthy and flowering. Pay particular attention to watering and winter protection; this is where container-grown plants are most vulnerable.
Hydrangea Container-Growing Checklist
- Start with a container at least 12 to 18 inches wide with adequate drainage holes.
- Use a high-quality potting mix that holds moisture but still drains well.
- Check drainage holes regularly and clear blockages.
- In summer, check if potted hydrangeas need watering daily.
- In winter, move containers to a sheltered, unheated space.
- Repot every two to three years into a container one size larger.
Add Support as Hydrangeas Grow
Some hydrangea varieties are top-heavy. For example, mophead varieties produce blooms so big that even a light rainstorm can weigh the stems down to the ground.
Once down, those stems may snap or fail to stay upright. This isn’t a sign of poor health; it’s natural for hydrangeas, and structural support can solve the problem.
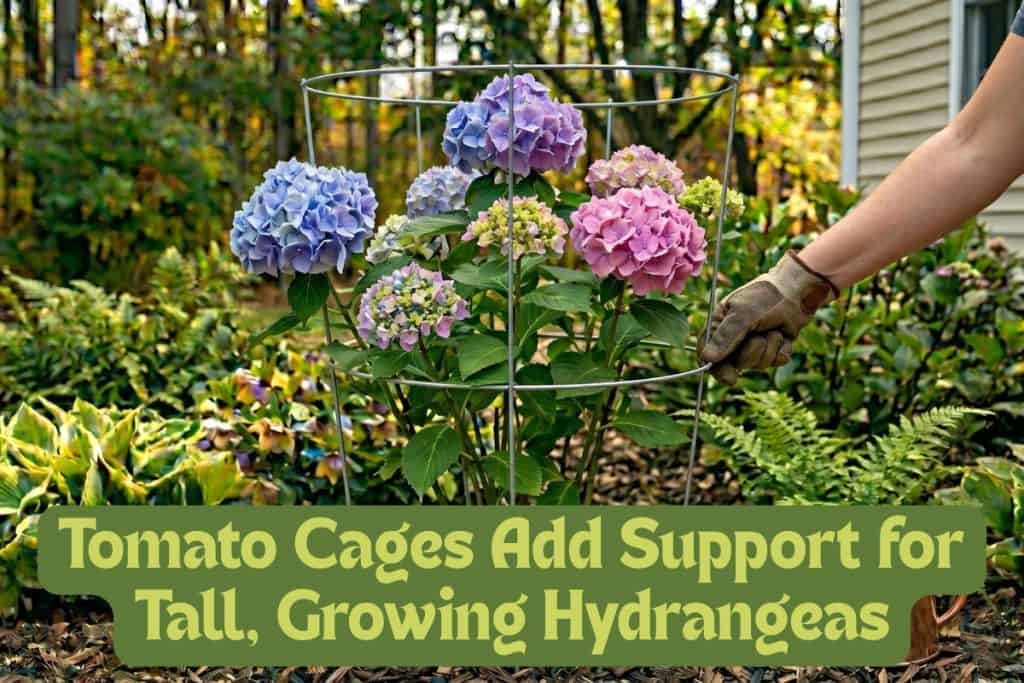
4 Steps to Add Support
- Install stakes or rings before stems reach full height.
- For single-stem plants, attach a bamboo stake with twine or Velcro to the stem.
- For multi-stemmed plants, grow-through rings or cages (like tomato cages) are ideal.
- Pruning smooth hydrangeas correctly reduces flopping with no supports.
Monitor Your Hydrangeas
Once your hydrangeas are prepped, planted, and supported, all that’s left is observing your plant to determine what it might need. Once you know what to look for, hydrangeas are surprisingly easy to read; their leaves and stems signal exactly what they need, removing the guesswork from care.
During heatwaves, be sure to check your plants daily. Conditions can shift rapidly; a plant that looked fine in the morning may be wilted by midday.
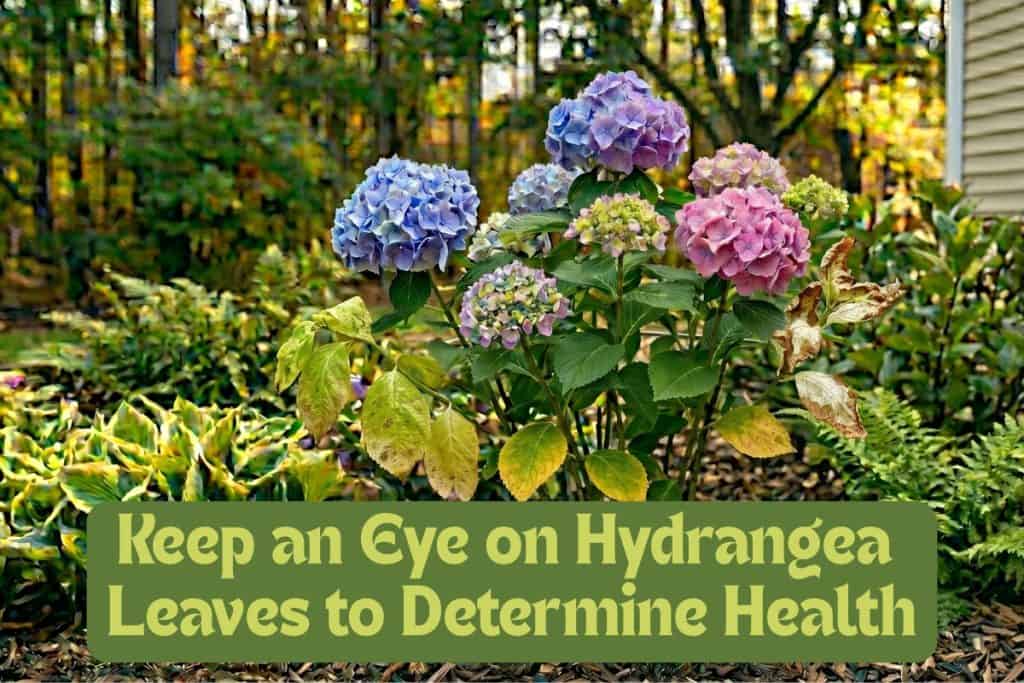
Act fast when you see an issue. A hydrangea showing early stress recovers quickly with intervention, but a struggling plant left too long may suffer damage that takes a full season to overcome.
Common Hydrangea Signs to Note
- Firm, Plump Leaves: Your plant is well-watered.
- Limp, Droopy Leaves: Your plant is getting too little or too much water.
- Deep Green Leaves: Your plant is healthy and well-nourished.
- Yellowing Older Leaves: Your plant has a nitrogen deficiency or waterlogged roots.
- Pale Leaves or Washed-Out Color: Your plant is getting too much direct sun.
Final Advice
Hydrangeas reward gardeners who take the time to understand them. It’s important to correctly identify your plant because, once you know which type you have, everything else falls into place.
If you’ve struggled with hydrangeas in the past, you may want to start with a panicle or smooth hydrangea. These are the most forgiving of the six types, and they can deliver a much more satisfying result.
A well-planted, properly pruned hydrangea that receives consistent water and winter protection can perform beautifully for many years. In fact, each year it will improve. After all, the more you understand them, the better hydrangeas perform.
Happy growing!


10 thoughts on “A Beginner’s Guide to Grow and Care for Hydrangeas”
Should hydrangeas be dead headed during the blooming season?
If you have a type of hydrangea that blooms on new wood, you can dead head it during the season. Some varieties will throw a second round of blooms and some won’t depending on variety. Thanks for reading! Diane
I copied another readers reply, but it epitomizes my thanks! Loved it is thorough!
Thank you Diane! This is the best, most thorough guide to cultivating the very best hydrangeas!
Margaret
Thank you Margaret. I appreciate the nice review and appreciate you reading it. It is heart breaking to see people disappointed because they don’t have any blooms. If they had just done a little research, they could have had a show-stopping shrub. Best wishes with your landscape. Diane
Great detail….thanks.
Your welcome. Enjoy your hydrangea plants!
Thank you for the great information! This will help with the recovery of two bigleaf I found at my local Lowe’s.
Thanks for visiting. Yes, Lowe’s sells a lot of hydrangeas and big leaf types are the most common.
Thank you Diane! This is the best, most thorough guide to cultivating the very best hydrangeas!
Thank you for visiting the website!